Android SDK Quick Start
ENGAGE® Android SDK Quick Start Guide
The ENGAGE Android SDK is a low-effort integration that will enable Android applications to receive ENGAGE content and deliver an enhanced calling experience for consumers. This guide provides detailed instructions to integrate the ENGAGE SDK 4.0.6 into an Android application.
Step 1. Requirements
- ENGAGE App ID, see Pre-Integration Steps
- ENGAGE configuration file, see Pre-Integration Steps
- First Orion Artifactory Credentials, see Pre-Integration Steps
- Android Studio Recommend using latest stable build
- An Android device or emulator (API Level 24 or newer) with "Google Play Store (Services)" installed
- Android Project, see Host App Requirements
Step 2. Setting Artifactory Credentials
When setting the First Orion Artifactory credentials, best practice is to set the values in a properties file, which will be ignored by the host app source code management and will not be checked into a source code repository.
2.1 Create Properties File
In the root of the project, create a file named artifactory.properties

2.2 Insert Credentials
Inside the 'artifactory.properties' file, add the proper credentials for First Orion's Artifactory. Credentials should have been supplied in the Pre-Integration Steps.
username=<REPLACE_WITH_USERNAME>
password=<REPLACE_WITH_PASSWORD>
The build.gradle file will be responsible for reading the credentials to securely connect to the First Orion artifact repository.
WARNINGIt is unsafe to store the artifactory.properties containing credentials file into a source code repository.
Step 3. Import ENGAGE SDK
The ENGAGE Android SDK is published in the First Orion artifact repository. Credentials to access the repository will be provided by First Orion before integration efforts begin. See Pre-Integration Steps
These credentials:
- should be securely stored
- should never be checked into a source code repository
- should be appropriately retrieved during integration and app build processes
3.1 Edit the Project-level build.gradle file
Add the following to the buildscript.repositories{} closure:
repositories {
    . . .
    maven {
        url "https://firstorion.jfrog.io/firstorion/fo-libs-release-external/"
        credentials {
            def artPropFile = rootProject.file("artifactory.properties")
            def artProps = new Properties()
            artProps.load(new FileInputStream(artPropFile))
            username = artProps ['username']
            password = artProps ['password']
        }
    }
}
Add the following JFrog BuildInfo dependency on the class path in buildscript{} dependencies{} closure:
dependencies {
    . . .
    classpath 'org.jfrog.buildinfo:build-info-extractor-gradle:4.24.15'
    . . .
}
Add the Artifactory Gradle plugin:
allprojects {
    apply plugin: "com.jfrog.artifactory"
    repositories {
        . . .
    }
    . . .
}
Add the artifactory{} closure to resolve Android ENGAGE library:
artifactory {
   contextUrl = "https://firstorion.jfrog.io/firstorion/"
   resolve {
      repository {
            repoKey = 'fo-libs-release-external'
            def artPropFile = rootProject.file("artifactory.properties")
            def artProps = new Properties()
            artProps.load(new FileInputStream(artPropFile))
            username = artProps ['username']
            password = artProps ['password']
            maven = true
        }
    }
}
3.2 Edit the App-level build.gradle file
Add the ENGAGE SDK dependencies in the dependencies{} closure:
def engage_version = "X.X.X"
implementation "com.firstorion:engage-core:$engage_version"
implementation "com.firstorion:engage-contacts:$engage_version"
implementation "com.firstorion:engage-firebase:$engage_version"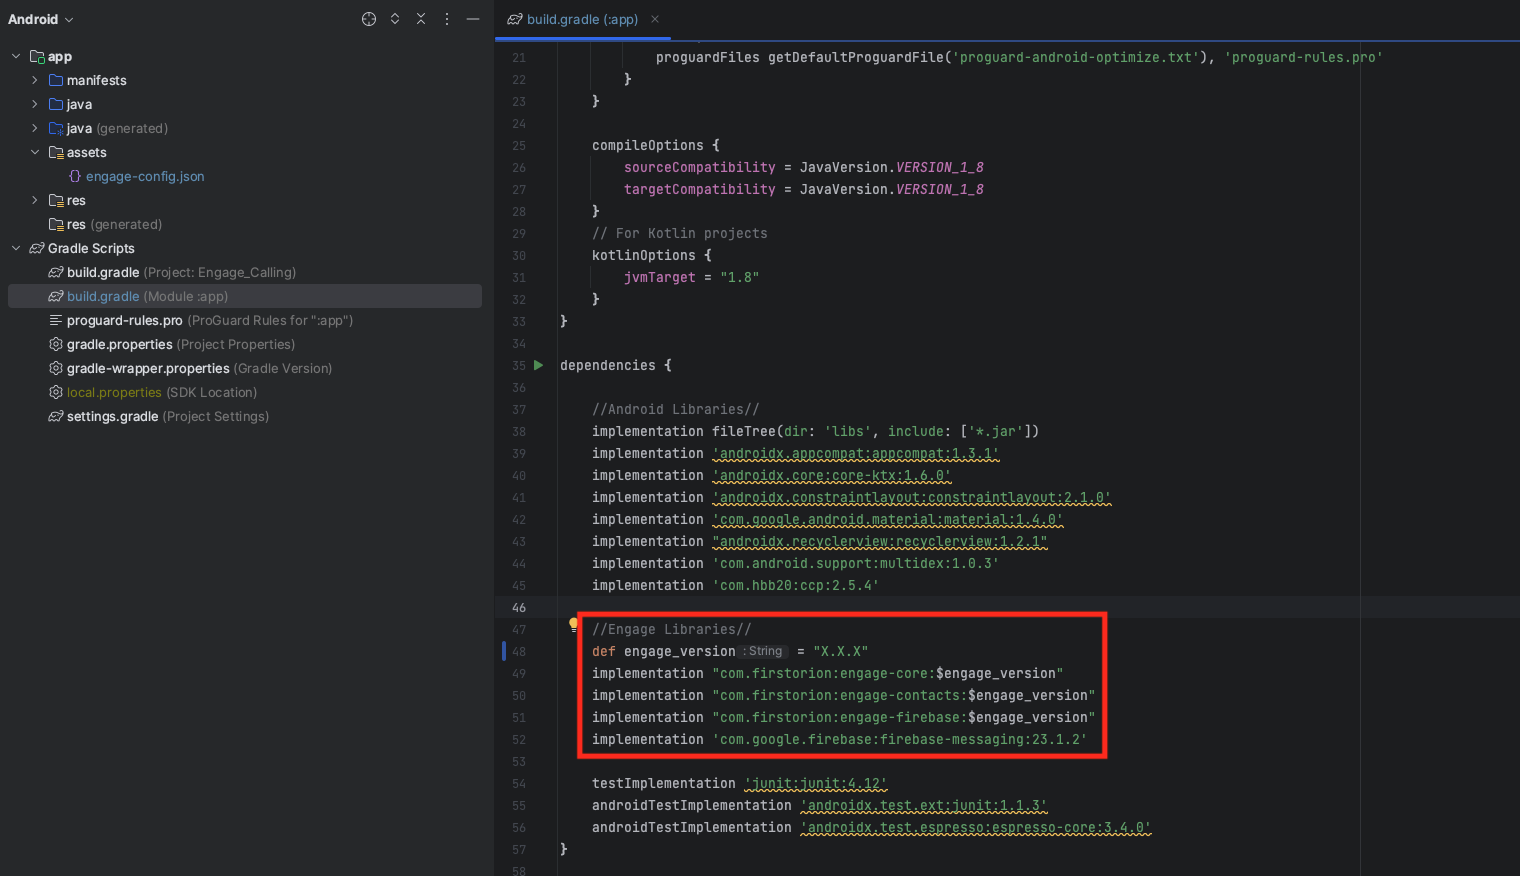
NOTEThe above is true for a basic integration. Please refer to Common Integration Scenarios to further explore a couple of the most common integrations.
3.3 Sync Gradle
Make sure to press "Sync Now" on the banner that pops up after saving.
Step 4. Setup ENGAGE Configuration
Before using, the ENGAGE SDK must be configured. The engage-config.json file, will be provided by First Orion. See Pre-Integration Steps.
4.1 Add the engage-config.json file to the following folder:
app/src/main/assets
Example of 'engage-config.json' file:
{
  "EngageEndpoint": "https://enage.endpoint.com/",
  "EngageAppId": "570696b2-24cf-455f-a586-95b3a28acc78",
  "EngageTokenType": "fofcm",
  "EngageVerificationType": "pin",
  "ConfigVersion": 3.0
}
4.2 Configure engage-config.json file
Change the engage-config.json file to best suit your use case. For more information on the ENGAGE config, see Engage Configuration.
Step 5. Request Permissions
The ENGAGE SDK requires specific permissions in order to function properly. See Android Permissions for more information.
5.1 Add Permissions to AndroidManifest.xml
Add the following permissions to AndroidManifest.xml:
<uses-permission android:name="android.permission.READ_CONTACTS"/>
<uses-permission android:name="android.permission.WRITE_CONTACTS"/>
Step 6. Setup Work Manager
The ENGAGE SDK uses WorkManager for job scheduling. ENGAGE SDK will initialize a default WorkManager instance if one does not exist.
If the host app already disables WorkManager automatic initialization, measures should be taken to guard against ENGAGE SDK attempting to automatically initialize WorkManager. See Work Manager.
If the host app does not use WorkManager or is okay with WorkManager automatic initialization, no additional work is required.
Step 7. Host App Specific Integration
The main setup of the ENGAGE SDK has been completed. All that is left is the host app specific integration of the ENGAGE SDK. All host apps should request the required permissions and register their users with the ENGAGE platform.
You can refer to the Android Gold Copy, which is included in the Pre-Integration Steps. This demo application serves as a reference on how to implement the final required functionality mentioned above.
If the host app uses Firebase, please refer to this to ensure ENGAGE functionality is not interrupted.
For more information, please refer to the following pages:
| Function | Purpose |
|---|---|
| Authentication | Common functions and implementation behind user authentication |
| Android Permissions | Permissions required by ENGAGE SDK and some common integrations |
| Firebase | How ENGAGE SDK uses Firebase and some common integrations |
| Logging | Common logging techniques for ENGAGE |
| WorkManager | How ENGAGE SDK uses WorkManager and some troubleshooting involving it |
Step 8. Test ENGAGE Push
Functionality must be tested after completing the ENGAGE SDK integration. From the Content Portal, customers can deliver content to a device through an easy-to-use interface.
A valid, configured ENGAGE Program must be created in the Content Portal before delivering the content. First Orion can provide testing assistance at any time.
8.1 Complete onboard in the host app
Start with a clean installation of the host app. Make sure the device has completed onboarding, accepted the required permissions, and is fully registered with the ENGAGE platform.
8.2 Schedule a test call on the First Orion Portal
Use the provided portal credentials that have been provided in the Pre-Integration Steps to log into First Orion's portal. Next you will want to select the configured ENGAGE Program and send a test call.
Wait a few seconds and you should see a test call come through with the expected contact name and image. If the call does not come through, please refer to the Troubleshooting.
Where to go from here?
Check out these pages for a deeper dive into the ENGAGE SDK
Cross-Platform CompatibilityENGAGE® support Flutter Framework. Please refer Flutter Quick Start Guide.
Updated 5 months ago