ENGAGE Flutter Plugin Quick Start
ENGAGE® Flutter Plugin Quick Start Guide
The ENGAGE PLUGIN is a low-effort integration that will enable Android and iOS applications to receive ENGAGE content and deliver an enhanced calling experience for consumers. This guide provides detailed instructions to integrate the ENGAGE PLUGIN into an application.
Step 1. Requirements
Android Requirements
- ENGAGE App ID, see Pre-Integration Steps
- ENGAGE configuration file, see Pre-Integration Steps
- First Orion Artifactory Credentials, see Pre-Integration Steps
- Android Studio Recommend using latest stable build
- An Android device or emulator (API Level 24 or newer) with "Google Play Store (Services)" installed
- Android Project, see Host App Requirements
iOS Requirements
- First Orion Account
- Host App opened in Xcode 12+ on MacOS
- Access to ENGAGE SDK via SPM or Cocoapods
- SDK Bitbucket access - provided by First Orion
- ENGAGE Configuration File - provided by First Orion
- iOS device for testing (Xcode simulator does not allow Push Notifications)
- iOS Push Certificate handed off to First Orion Learn More
For more info, see this page.
Step 2. ENGAGE® Flutter Plugin Setup
2.1 Open pubspec.yaml
Open your Flutter project's pubspec.yml file.
2.2 Add Dependency
Add the Engage plugin as a dependency under the dependencies section of the pubspec.yaml file. Use the version provided by the plugin's documentation. For example:
dependencies:

 flutter_engage_plugin :
   hosted: https://firstorion.jfrog.io/artifactory/api/pub/fo-external-pub-flutter
   version: 2.0.0
Step 3. Add Artifactory Identity Token
Before adding the Engage plugin dependency, you need to add the Artifactory identity token to authenticate with the repository. See Pre-Integration Steps
These credentials:
- should be securely stored
- should never be checked into a source code repository
- should be appropriately retrieved during integration and app build processes
- Login into the First Orion Artifactory with the credentials provided.
- Navigate to the Artifactory -> Artifacts.
- Select the artifactory
fo-external-pub-flutter. - Click on
Set Me Upoption and enter the password of your account to generate the token and follow the steps. - Run the following command in the terminal:
dart pub token add "https://firstorion.jfrog.io/artifactory/api/pub/fo-external-pub-flutter"Step 4. Install Dependencies
Save the pubspec.yaml file and run the following command in the terminal. This command fetches and installs the ENGAGE Flutter Plugin along with its dependencies into your Flutter project:
flutter pub getStep 5. Setup Android
5.1. Setting Artifactory Credentials
When setting the First Orion Artifactory credentials, best practice is to set the values in a properties file, which will be ignored by the host app source code management and will not be checked into a source code repository.
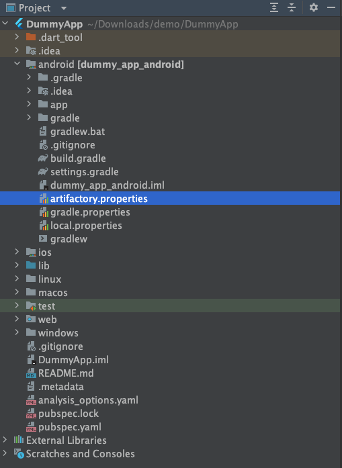
5.1.1 Create Properties File
In the root of the Android Project Folder, create a file named artifactory.properties
5.1.2 Insert Credentials
Inside the 'artifactory.properties' file, add the proper credentials for First Orion's Artifactory. Credentials should have been supplied in the Pre-Integration Steps.
username=<REPLACE_WITH_USERNAME>
password=<REPLACE_WITH_PASSWORD>
WARNINGIt is unsafe to store the artifactory.properties containing credentials file into a source code repository.
5.2. Android Gradle Configuration (AGP- Android Gradle Plugin)
5.2.1. AGP Version below 7.x and Flutter version below 3.16
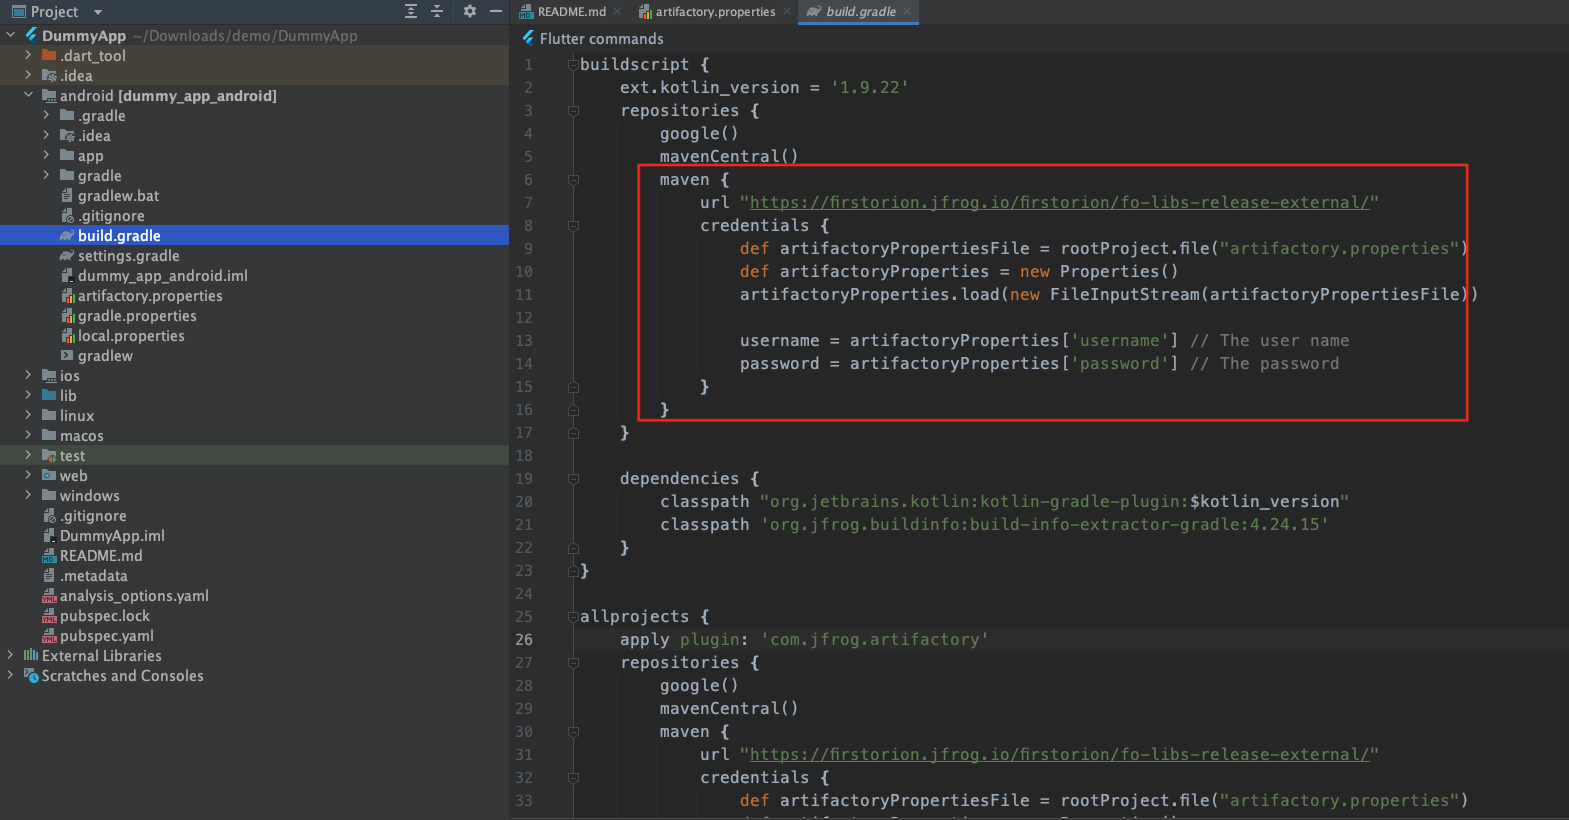
In your Android Flutter Projectandroid/build.gradle file add the following configuration inside the allprojects and buildscript block:
repositories {
    . . .
    maven {
        url "https://firstorion.jfrog.io/firstorion/fo-libs-release-external/"
        credentials {
            def artPropFile = rootProject.file("artifactory.properties")
            def artProps = new Properties()
            artProps.load(new FileInputStream(artPropFile))
            username = artProps ['username']
            password = artProps ['password']
        }
    }
}
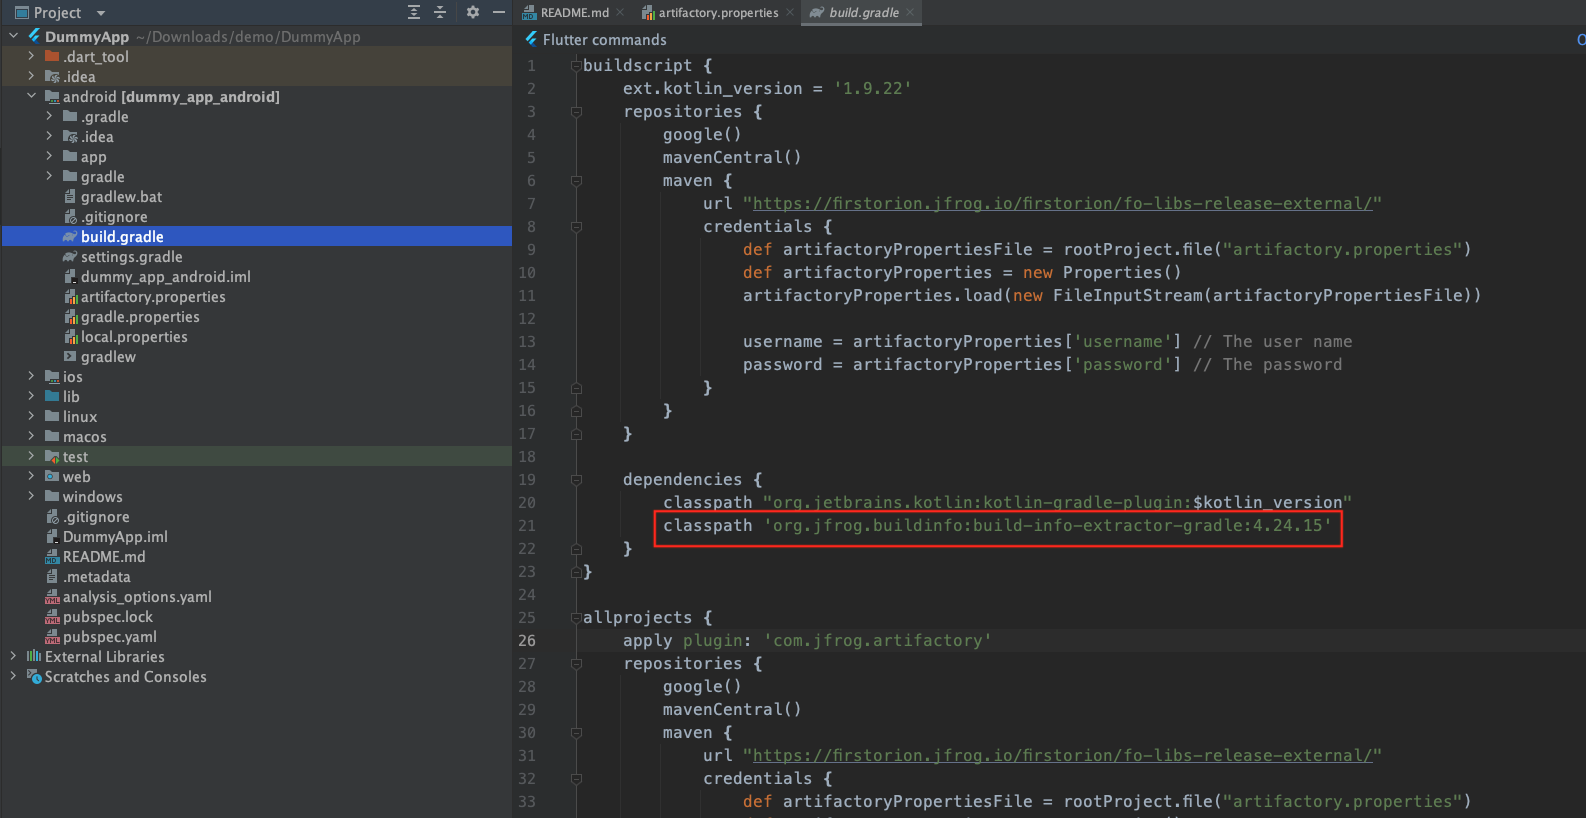
Add the following JFrog BuildInfo dependency on the classpath in buildscript dependencies closure:
dependencies {
    . . .
    classpath 'org.jfrog.buildinfo:build-info-extractor-gradle:4.24.15'
    . . .
}
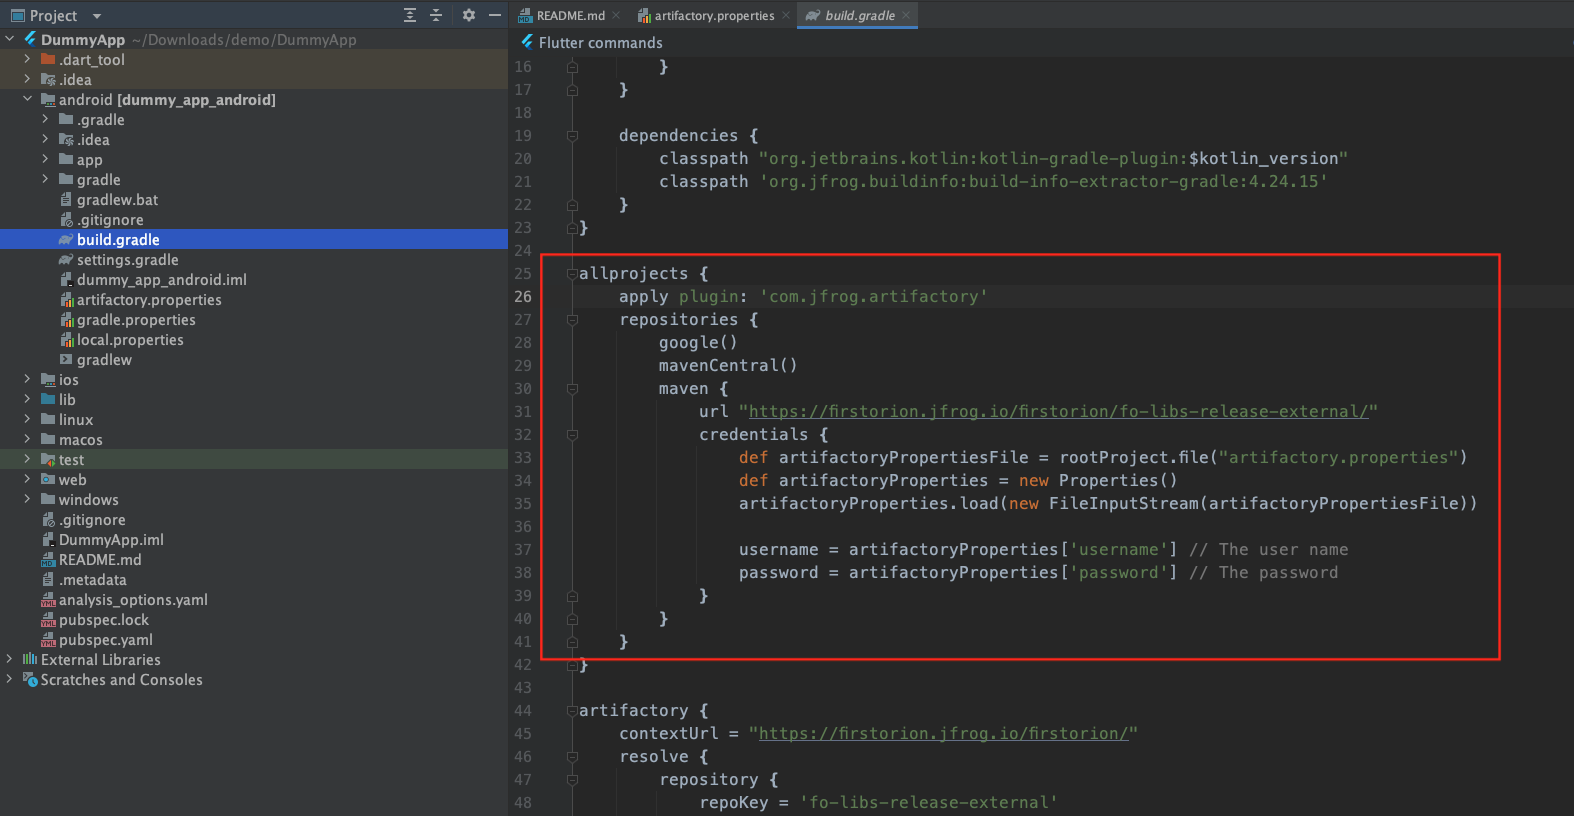
Add the Artifactory Gradle plugin:
allprojects {
    apply plugin: "com.jfrog.artifactory"
    repositories {
        . . .
    }
    . . .
}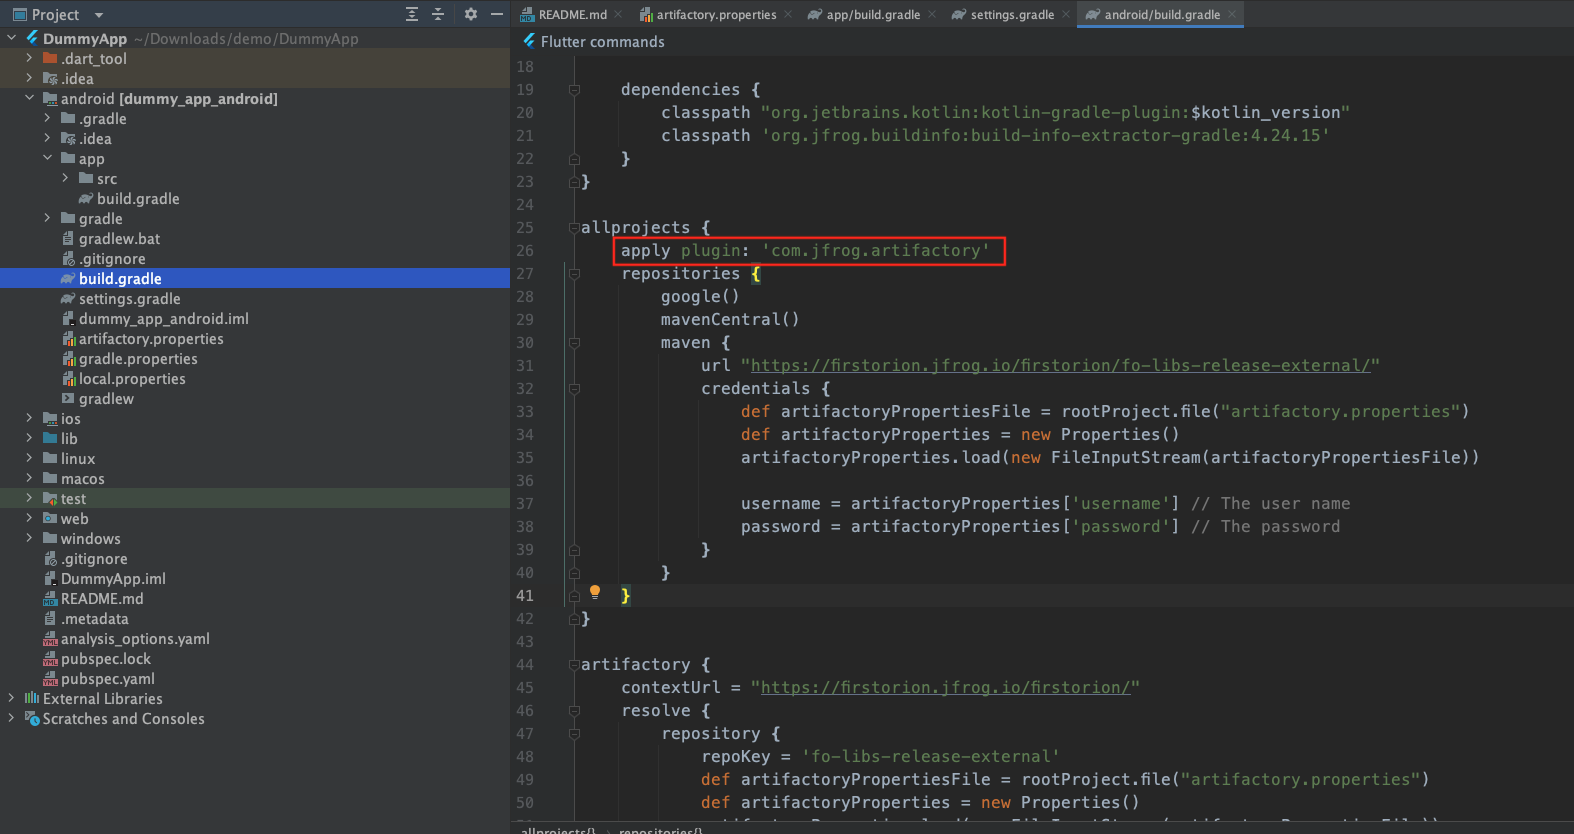
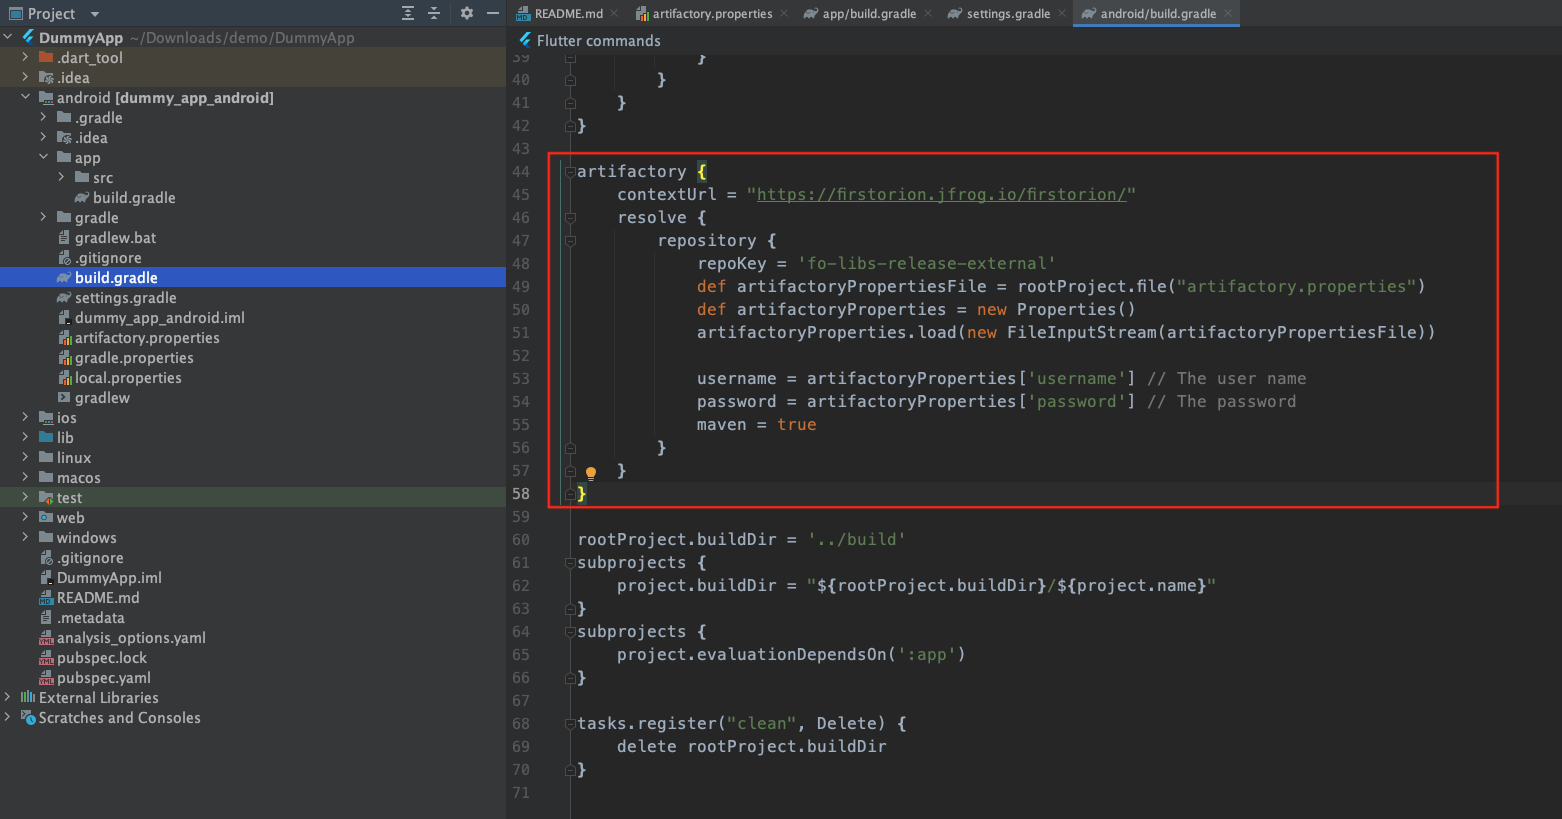
Add the artifactory closure to resolve the Android ENGAGE library:
artifactory {
   contextUrl = "https://firstorion.jfrog.io/firstorion/"
   resolve {
      repository {
            repoKey = 'fo-libs-release-external'
            def artPropFile = rootProject.file("artifactory.properties")
            def artProps = new Properties()
            artProps.load(new FileInputStream(artPropFile))
            username = artProps ['username']
            password = artProps ['password']
            maven = true
        }
    }
}
5.2.2. AGP Version 7.x and above & Flutter version 3.16 and above
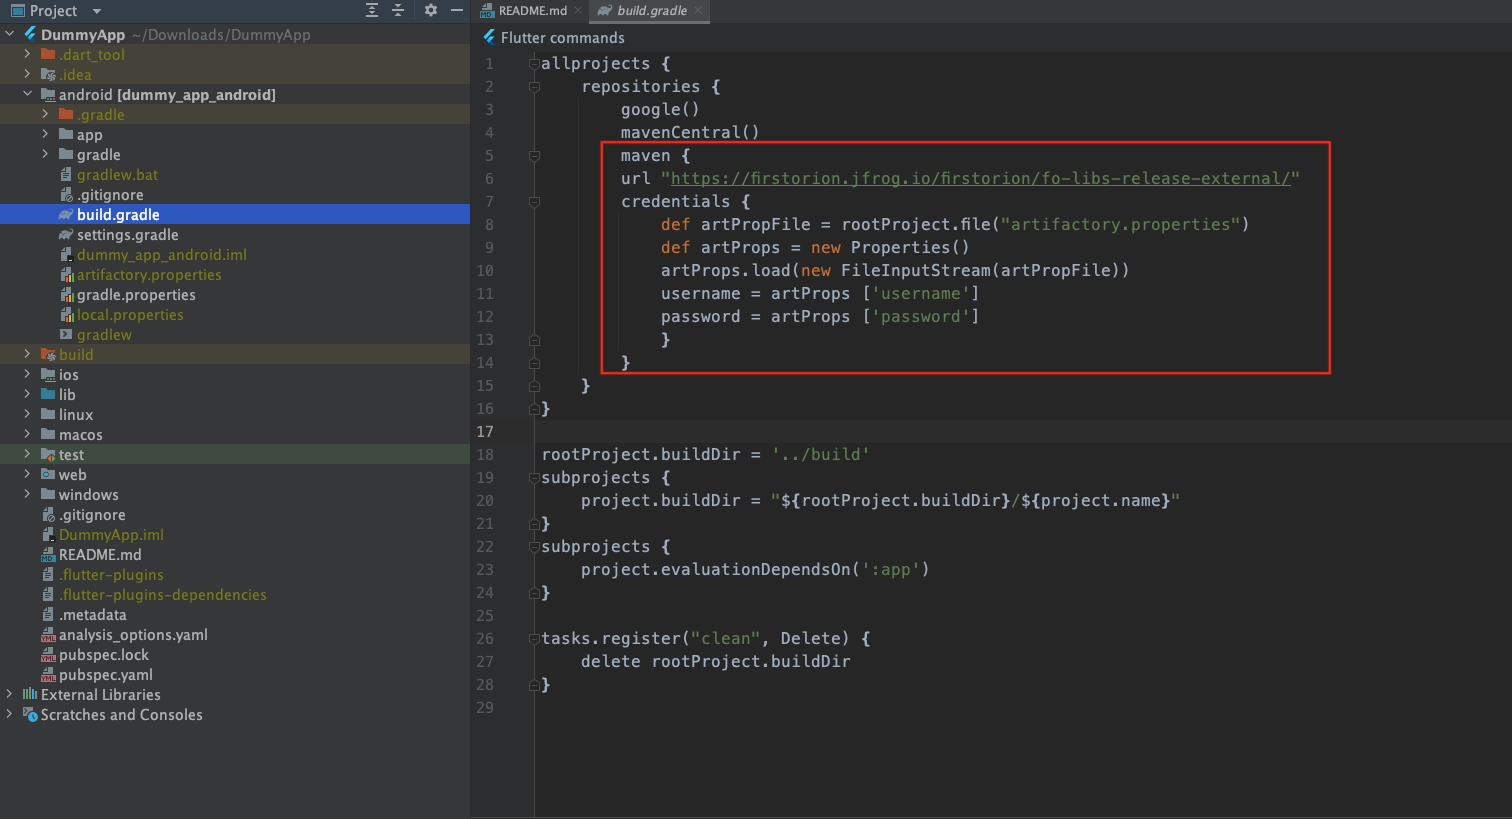
In your Flutter Android project android/build.gradle file, add the following configuration inside the allprojects block:
allprojects {
    repositories {
       ...
       maven {
       url "https://firstorion.jfrog.io/firstorion/fo-libs-release-external/"
       credentials {
           def artPropFile=rootProject.file("artifactory.properties")
           def artProps = new Properties()
           artProps.load(new FileInputStream(artPropFile))
           username = artProps ['username']
           password = artProps ['password']
           }
       }
    }
}
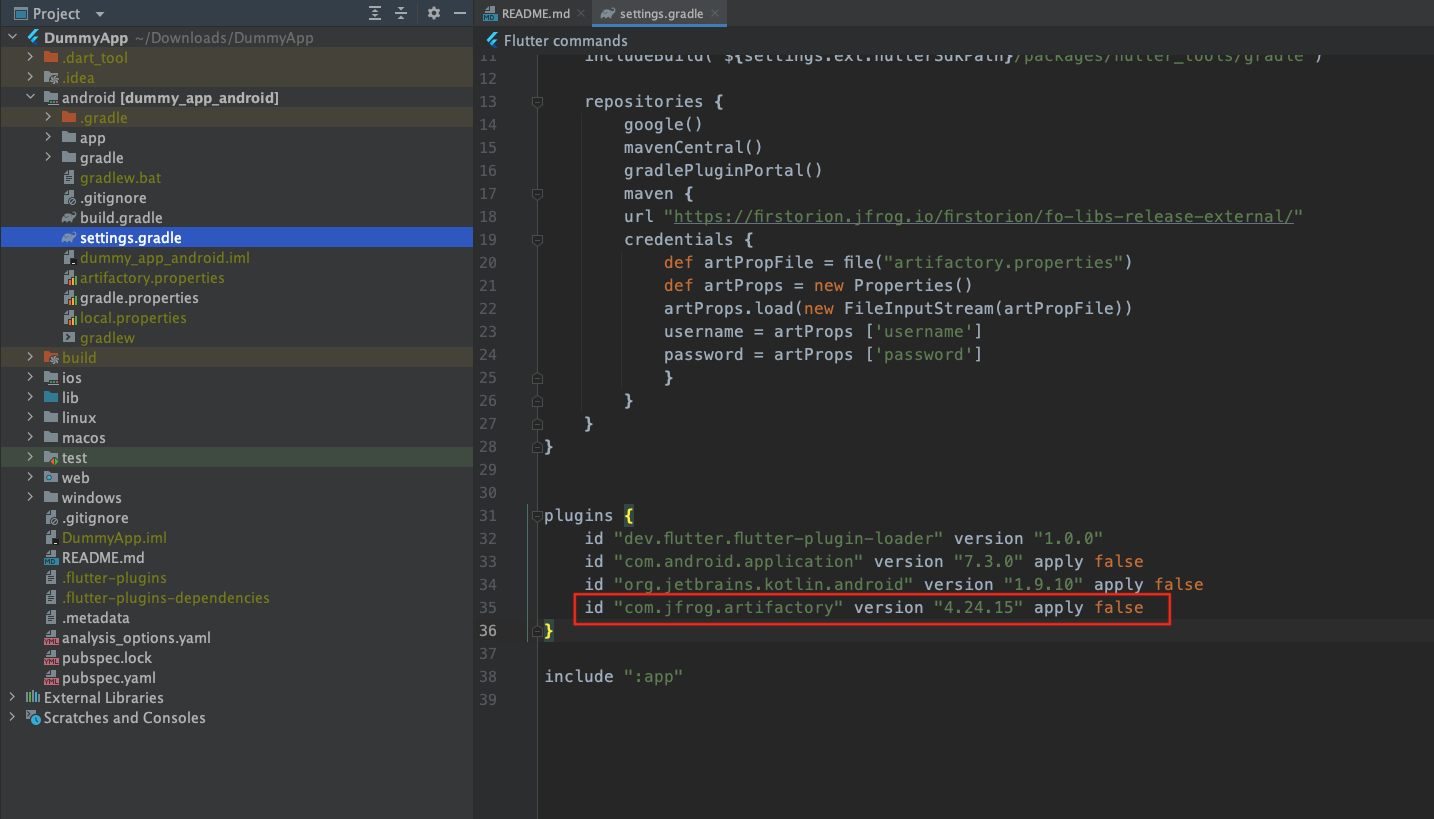
In your Flutter Android project android/setting.gradle file, add the following configuration inside the pluginManagement -> repositories block and plugins block:
repositories {
    ...
    maven {
   url "https://firstorion.jfrog.io/firstorion/fo-libs-release-external/"
   credentials {
       def artPropFile = file("artifactory.properties")
       def artProps = new Properties()
       artProps.load(new FileInputStream(artPropFile))
       username = artProps ['username']
       password = artProps ['password']
       }
   }
}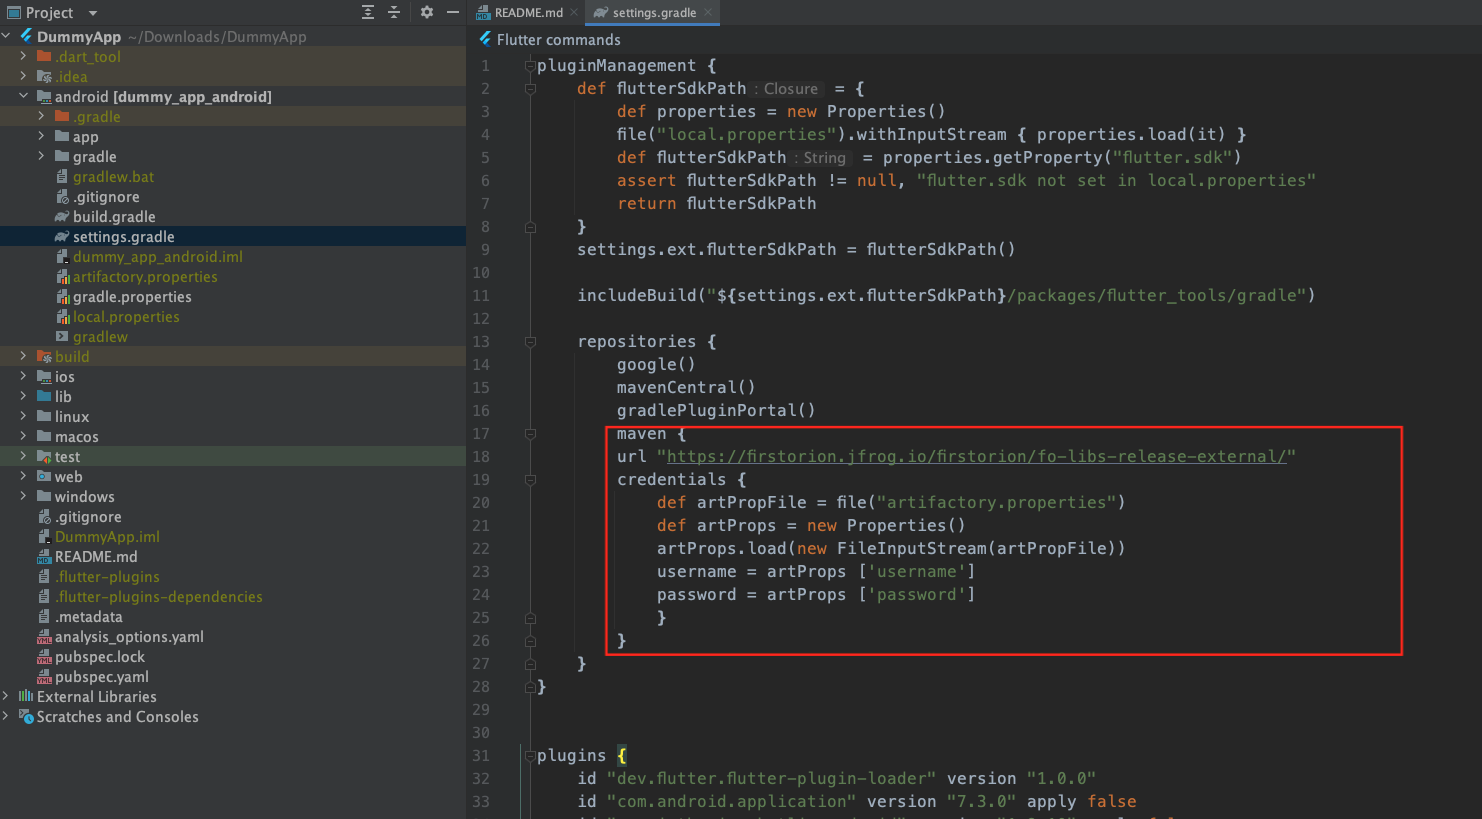
plugins {
	....
    	id "com.jfrog.artifactory" version "4.24.15" apply false
}
5.3. Setup ENGAGE Configuration
Before using, the ENGAGE SDK must be configured. The engage-config.json file, will be provided by First Orion. See Pre-Integration Steps.
Add the engage-config.json file to the following folder:
app/src/main/assets
Example of 'engage-config.json' file:
{
  "EngageEndpoint": "https://enage.endpoint.com/",
  "EngageAppId": "570696b2-24cf-455f-a586-95b3a28acc78",
  "EngageTokenType": "fofcm",
  "EngageVerificationType": "pin",
  "ConfigVersion": 3.0
}
Change the engage-config.json file to best suit your use case. For more information on the ENGAGE config, see Engage Configuration.
5.4. Request Permissions
The ENGAGE SDK requires specific permissions in order to function properly. See Android Permissions for more information.
Add the following permissions to AndroidManifest.xml and request this permission using permission_handlerpackage in your flutter code. Refer Host App Specific Integration section.
<uses-permission android:name="android.permission.READ_CONTACTS"/>
<uses-permission android:name="android.permission.WRITE_CONTACTS"/>
Step 6. Setup iOS
6.1. Configure .netrc for Authentication
To authenticate, please add the credentials to the .netrc file. Below are the steps to create .netrc file:
- Open Terminal: You can open Terminal by searching for it in Spotlight or by navigating to Applications > Utilities > Terminal.
- Once Terminal is open, type the following command and press Enter:
nano ~/.netrcThis command will open the .netrc file (or create it if it doesn't exist) in the nano text editor.
- Add the following lines to the file, replacing <YOUR_BITBUCKET_USERNAME> and <YOUR_APP_PASSWORD> with your actual credentials which can be generated from the SDK Bitbucket repository access provided by First Orion. Refer link to create Bitbucket App Password.
machine bitbucket.org
login <YOUR_BITBUCKET_USERNAME>
password <YOUR_APP_PASSWORD>- Press Ctrl + X to exit nano. It will prompt you to save the changes; press Y for yes, then press Enter to confirm the filename.
- Finally, make sure the .netrc file has the correct permissions by typing the following command and pressing Enter:
chmod 600 ~/.netrcThis command ensures that only you, the file owner, can read and write to the .netrc file, which is important for security.
6.2. Add Configuration File
Add the engage-config.json file provided by First Orion to your project. Be sure to add it to your host app target so that it is included in your app bundle. For more info on this file, see this page.
6.3. Add Notification Service Extension
6.3.1 Click File --> New --> Target.
6.3.2 Select Notification Service Extension then click Next.

6.3.3 Enter the Product Name as EngageNotificationServiceExtension or similar and click Finish.

6.3.4 Click Cancel when Activate scheme prompt displays.
6.3.5 In the project navigator, select the top-level project directory and select the EngageNotificationServiceExtension target in the Targets list.
Ensure the Deployment Target in the notification extension and the Main Application Target are set as the same. Example: iOS 13.1

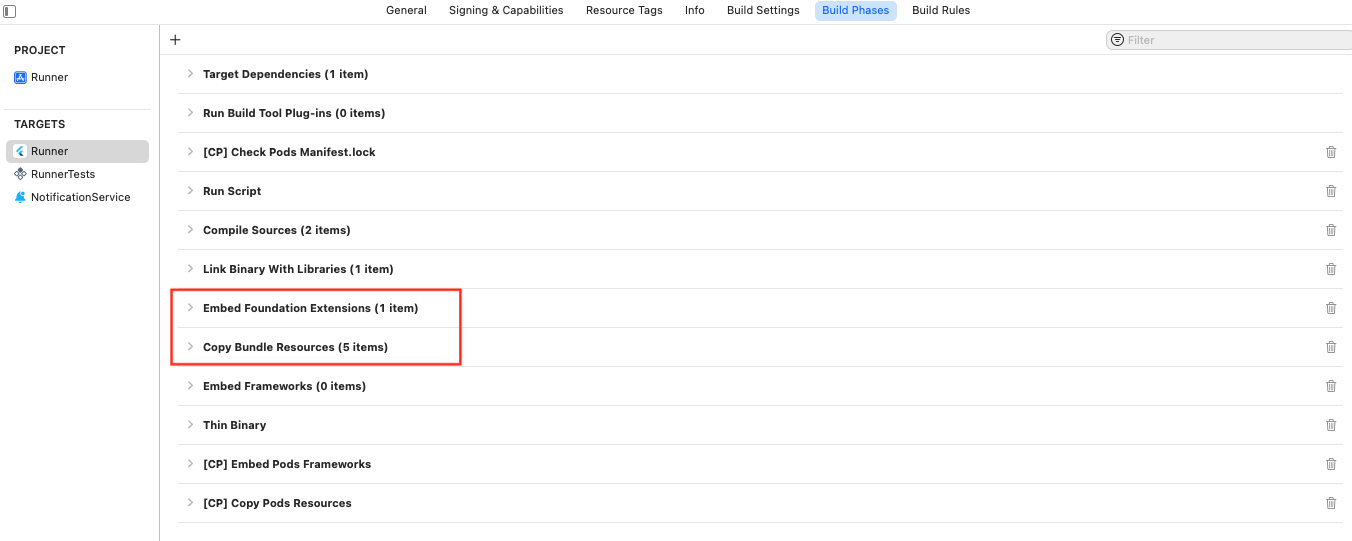
6.3.6 In the project navigator, Go to the Targets-> Runner-> Build Phases-> Embed Foundation Extensions. it's essential to ensure that the Embed Foundation Extensions in Build Phases is positioned directly above the Copy Bundle Resources phase to properly prioritize the embedding of system frameworks and extensions.
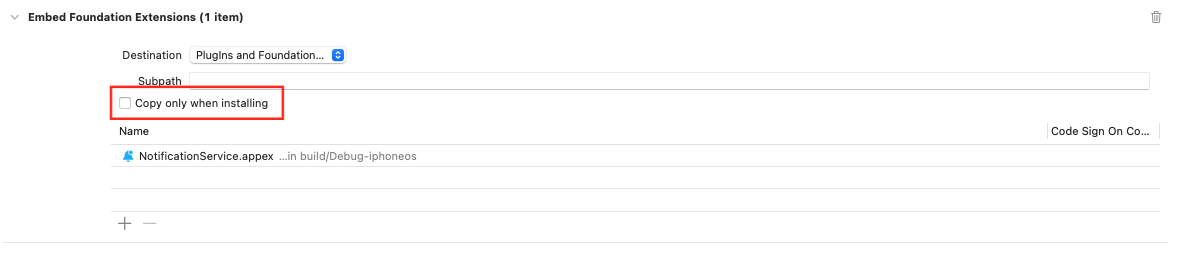
6.3.7 When configuring the Embed Foundation Extensions build phase in Xcode, it's important to ensure that the "Copy only when installing" option is unchecked.
6.3.8 In the project navigator, select EngageNotificationServiceExtension, then open NotificationService.swift and replace the whole class with the following code.
NOTE: Ignore all build errors related to ENGAGE at this point, the ENGAGE dependence will be added next.
import EngageKit
import UserNotifications

class NotificationService: UNNotificationServiceExtension {
    override func didReceive(
        _ request: UNNotificationRequest,
        withContentHandler contentHandler: @escaping (UNNotificationContent) -> Void
    ) {
        Engage.shared.handleNSEPush(
            request,
            using: "<YourAppGroup>", // Insert your App Group ID
            includeThumbnail: false, // (Optional) Defaults to true if left out. Determines whether thumbnails are displayed in content pushes
            withContentHandler: contentHandler // Pass in the content handler parameter
        )
    }

    override func serviceExtensionTimeWillExpire() {
        Engage.shared.nseTimeExpiring()
    }
}
The handleNSEPush method passes the notification content to the SDK to process.
Starting in ENGAGE V3.0.2, an optional parameter includeThumbnail may be included to show/hide the thumbnail image in contact creation push notifications. If this parameter is left out, images will show by default.
NOTE:Ignore all build errors at this point, the ENGAGE dependency will be added to resolve any errors.
6.4. Setup ENGAGE SDK
IMPORTANT: SPM Support Added!As of version 2.0.0, this plugin supports both CocoaPods and Swift Package Manager (SPM) for iOS integration. Existing users can continue using CocoaPods, while new users are encouraged to try SPM for a simpler setup. See below for both options.
Option 1: Integrate via CocoaPods (Legacy, Still Supported)
6.4.1. Configure Podfile
In your Podfile, make sure to add ENGAGE SDK dependencies as shown below:
platform :ios, '14.0'
use_frameworks!
use_modular_headers!

target 'Runner' do
  pod 'EngageKit', :git => 'https://bitbucket.org/fopartner/engagesdk_ios.git', :tag => '4.3.0'
  flutter_install_all_ios_pods File.dirname(File.realpath(__FILE__))
end

target 'RunnerNSE' do
  pod 'EngageKit', :git => 'https://bitbucket.org/fopartner/engagesdk_ios.git', :tag => '4.3.0'
end

post_install do |installer|
  installer.pods_project.targets.each do |target|
    flutter_additional_ios_build_settings(target)

    target.build_configurations.each do |config|
      config.build_settings['GCC_PREPROCESSOR_DEFINITIONS'] ||= [
        '$(inherited)',
        'PERMISSION_CONTACTS=1',
        'PERMISSION_NOTIFICATIONS=1',
      ]
    end
  end
end
6.4.2. Instal Pods
After that, in terminal, navigate to yourFlutterProject/ios/ and run:
$ pod installOption 2: Integrate via Swift Package Manager (Recommended)
6.4.1. Enable SPM support in your Flutter SDK (requires Flutter 3.24+):
flutter config --enable-swift-package-managerRefer to the Flutter Plugin SPM Integration page for more details.
Note:
- Both methods are supported. SPM is recommended for new projects or if you want to avoid CocoaPods.
- If you migrate from CocoaPods to SPM, you can safely remove the Podfile and Pods directory after verifying SPM integration works.
- If you encounter issues, ensure your Flutter version is up to date and SPM is enabled with
flutter config --enable-swift-package-manager.
6.5. Add Remote Notifications Capability
This step will enable your app to receive remote notifications.
Only do this for the main application target.
Do not do this for the Notification Service Extension.
6.5.1 Select your main app target's "Signing & Capabilities".
6.5.2 If you do not see Push Notifications enabled, click "+ Capability" and add "Push Notifications".
6.5.3 Click "+ Capability" and add "Background Modes". Then check "Remote notifications".
6.6. Add App Groups
ENGAGE SDK requires that the main app and the notification extension share a single App Group. If you have already configured a shared app group, and it is added to both targets, continue to Step 6.6.
6.6.1 Select your main app target's "Signing & Capabilities".
6.6.2 Click "+ Capability" and add "App Groups".
6.6.3 Add a new app group and give it an appropriate name. If it shows up in red, hit the refresh button below the name to confirm the app group has been registered with your Apple developer account.

6.6.4 Select the EngageNotificationServiceExtension target's "Signing & Capabilities".
6.6.5 Click "+ Capability" and add "App Groups".
6.6.6 Select the same App Group ID as the main app target.

6.7. Add Contact Permission Description
To request contact permission from the users, it is mandatory to specify the context of the usage to the user as per Apple Guidelines. If the context is already defined in the info.plist file, continue to the next step.
6.8. Add Method Channel code in AppDelegate.swift
Register the plugin method channel in AppDelegate so that it can communicate with flutter engage plugin and pass the addition data to plugin so that it can handle iOS functionality.
import UIKit
import Flutter
import EngageKit

@UIApplicationMain
@objc class AppDelegate: FlutterAppDelegate {

    private var deviceTokenMethodChannel: FlutterMethodChannel?
    private var pushDataMethodChannel: FlutterMethodChannel?

    override func application(
        _ application: UIApplication,
        didFinishLaunchingWithOptions launchOptions: [UIApplication.LaunchOptionsKey: Any]?
    ) -> Bool {

				//Set ENGAGE Logging Level
				Engage.logVerbosity = .minimal

        GeneratedPluginRegistrant.register(with: self)
        // Set up the method channel
        if let controller = window?.rootViewController as? FlutterViewController {
            deviceTokenMethodChannel = FlutterMethodChannel(
                name: "ios_device_token_channel",
                binaryMessenger: controller.binaryMessenger
            )
            pushDataMethodChannel = FlutterMethodChannel(
                name: "push_data_channel",
                binaryMessenger: controller.binaryMessenger
            )
        }
        UIApplication.shared.registerForRemoteNotifications()
        return super.application(application, didFinishLaunchingWithOptions: launchOptions)
    }

    override func application(
        _ application: UIApplication,
        didRegisterForRemoteNotificationsWithDeviceToken deviceToken: Data
    ) {
        let tokenString = deviceToken.map { String(format: "%02.2hhx", $0) }.joined()
        deviceTokenMethodChannel?.invokeMethod("providePushTokenToSDK", arguments: tokenString)
    }

    override func application(
        _ application: UIApplication,
        didReceiveRemoteNotification userInfo: [AnyHashable : Any],
        fetchCompletionHandler completionHandler: @escaping (UIBackgroundFetchResult) -> Void
    ) {
        pushDataMethodChannel?.invokeMethod("handlePushNotification", arguments: userInfo)
    }

    override func application(
        _ application: UIApplication,
        didReceiveRemoteNotification userInfo: [AnyHashable : Any]
    ) {
        pushDataMethodChannel?.invokeMethod("handlePushNotification", arguments: userInfo)
    }
}
You can refer to the details on what each method is doing from this section.
Step 7. Host App Specific Integration
The main setup of the ENGAGE SDK has been completed. All that is left is the host app specific integration of the ENGAGE SDK. All host apps should request the required permissions and register their users with the ENGAGE platform.
You can refer to the Flutter Gold Copy, which is included in the Pre-Integration Steps. This demo application serves as a reference on how to implement the final required functionality mentioned above.
For more information, please refer to the following pages with step-by-step instructions:
| Function | Purpose |
|---|---|
| Authentication | Common functions and implementation behind user authentication |
| Permissions | Permissions required by ENGAGE SDK and some common integrations |
| Firebase Android | How ENGAGE Flutter Plugin uses Firebase for Android and some common integrations |
| Logging Android | Common logging techniques for Android ENGAGE SDK |
| Logging iOS | Common logging techniques for iOS ENGAGE SDK |
Step 8. Test ENGAGE Push
Functionality must be tested after completing the ENGAGE SDK integration. From the Content Portal, customers can deliver content to a device through an easy-to-use interface.
A valid, configured ENGAGE Program must be created in the Content Portal before delivering the content. First Orion can provide testing assistance at any time.
8.1 Complete onboard in the host app
Start with a clean installation of the host app. Make sure the device has completed onboarding, accepted the required permissions, and is fully registered with the ENGAGE platform.
8.2 Schedule a test call on the First Orion Portal
Use the provided portal credentials that have been provided in the Pre-Integration Steps to log into First Orion's portal. Next you will want to select the configured ENGAGE Program and send a test call.
Wait a few seconds and you should see a test call come through with the expected contact name and image. If the call does not come through, please refer to the Troubleshooting.
Updated 5 months ago