iOS SDK Quick Start
ENGAGE® iOS SDK Quick Start Guide
The ENGAGE iOS SDK is a low-effort integration that will enable iOS applications to receive ENGAGE content and deliver an enhanced calling experience for consumers. This guide provides detailed instructions to integrate the ENGAGE SDK 4.2.0 into an iOS application.
Step 1. Requirements
- First Orion Account
- Host App opened in Xcode 12+ on MacOS
- Access to ENGAGE SDK via Swift Package Manager
- ENGAGE Configuration File - provided by First Orion
- iOS device for testing (Xcode simulator does not allow Push Notifications)
- iOS Push Certificate handed off to First Orion Learn More
For more info, see this page.
Step 2. Add ENGAGE SDK
The preferred way to resolve the ENGAGE SDK XCFramework is via Swift Package Manager. During pre-integration, credentials should be provided to access to the First Orion Bitbucket account. See the Swift Package repo Readme for installation instructions.
ENGAGE SDK is also available via Cocoapods. See this page for instructions.
Step 3. Add Configuration File
Add the engage-config.json file provided by First Orion to your project. Be sure to add it to your host app target so that it is included in your app bundle. For more info on this file, see this page.
Step 4. Add Notification Service Extension
4.1 Click File --> New --> Target.
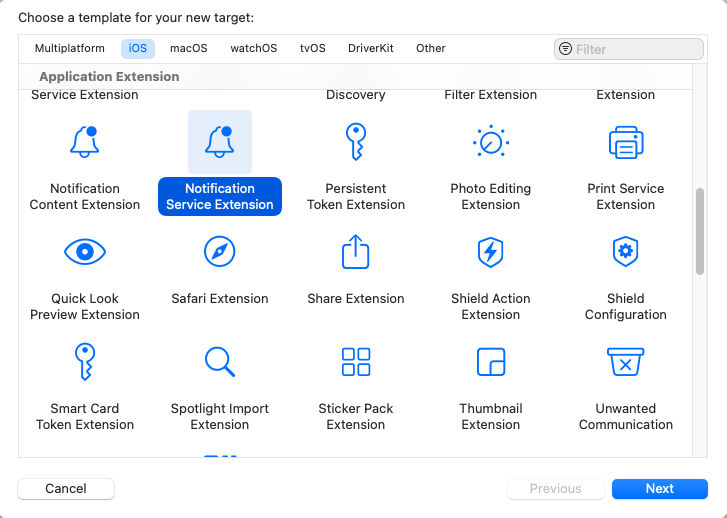
4.2 Select Notification Service Extension then click Next.
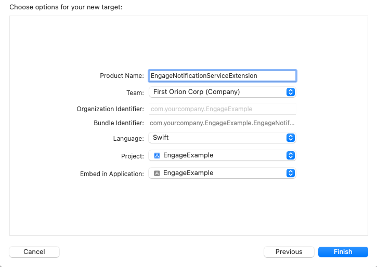
4.3 Enter the Product Name as EngageNotificationServiceExtension or similar and click Finish.
4.4 Click Cancel when Activate scheme prompt displays.
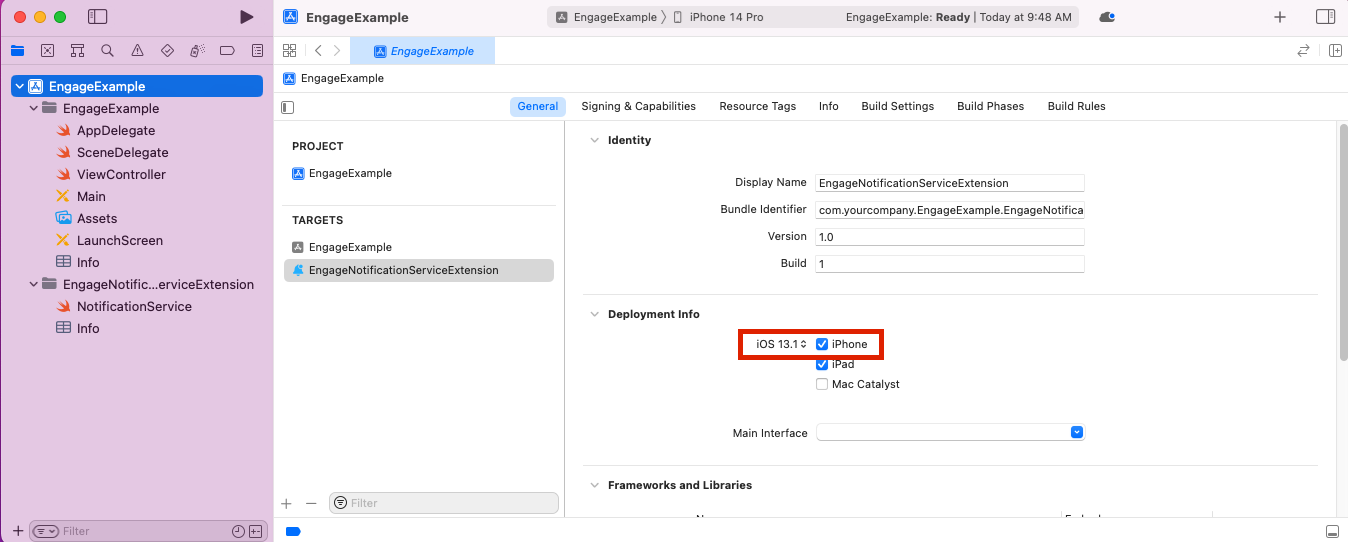
4.5 In the project navigator, select the top-level project directory and select the EngageNotificationServiceExtension target in the Targets list.
Ensure the Deployment Target in the notification extension and the Main Application Target are set as the same. Example: iOS 13.1
4.6 In the project navigator, select EngageNotificationServiceExtension, then open NotificationService.swift and replace the whole class with the following code.
NOTE: Ignore all build errors related to ENGAGE at this point, the ENGAGE dependence will be added next.
import EngageKit
import UserNotifications

class NotificationService: UNNotificationServiceExtension {
    override func didReceive(
        _ request: UNNotificationRequest,
        withContentHandler contentHandler: @escaping (UNNotificationContent) -> Void
    ) {
        Engage.shared.handleNSEPush(
            request,
            using: "<YourAppGroup>", // Insert your App Group ID
            includeThumbnail: false, // (Optional) Defaults to true if left out. Determines whether thumbnails are displayed in content pushes
            withContentHandler: contentHandler // Pass in the content handler parameter
        )
    }

    override func serviceExtensionTimeWillExpire() {
        Engage.shared.nseTimeExpiring()
    }
}
The handleNSEPush method passes the notification content to the SDK to process.
Starting in ENGAGE V3.0.2, an optional parameter includeThumbnail may be included to show/hide the thumbnail image in contact creation push notifications. If this parameter is left out, images will show by default.
NOTE:
Ignore all build errors at this point, the ENGAGE dependency will be added to resolve any errors.
Step 5. Add Remote Notifications Capability
This step will enable your app to receive remote notifications.
Only do this for the main application target.
Do not do this for the Notification Service Extension.
5.1 Select your main app target's "Signing & Capabilities".
5.2 If you do not see Push Notifications enabled, click "+ Capability" and add "Push Notifications".
5.3 Click "+ Capability" and add "Background Modes". Then check "Remote notifications".
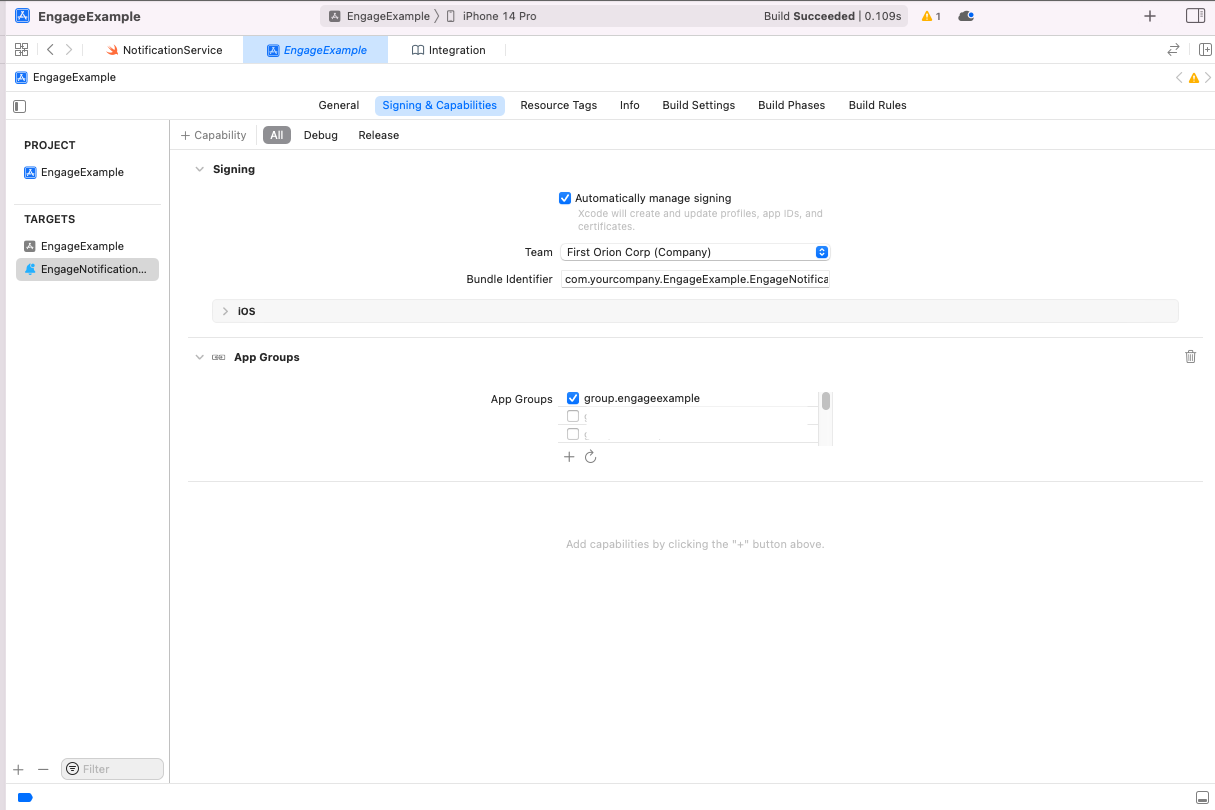
Step 6. Add App Groups
ENGAGE SDK requires that the main app and the notification extension share a single App Group. If you have already configured a shared app group, and it is added to both targets, continue to Step 7.
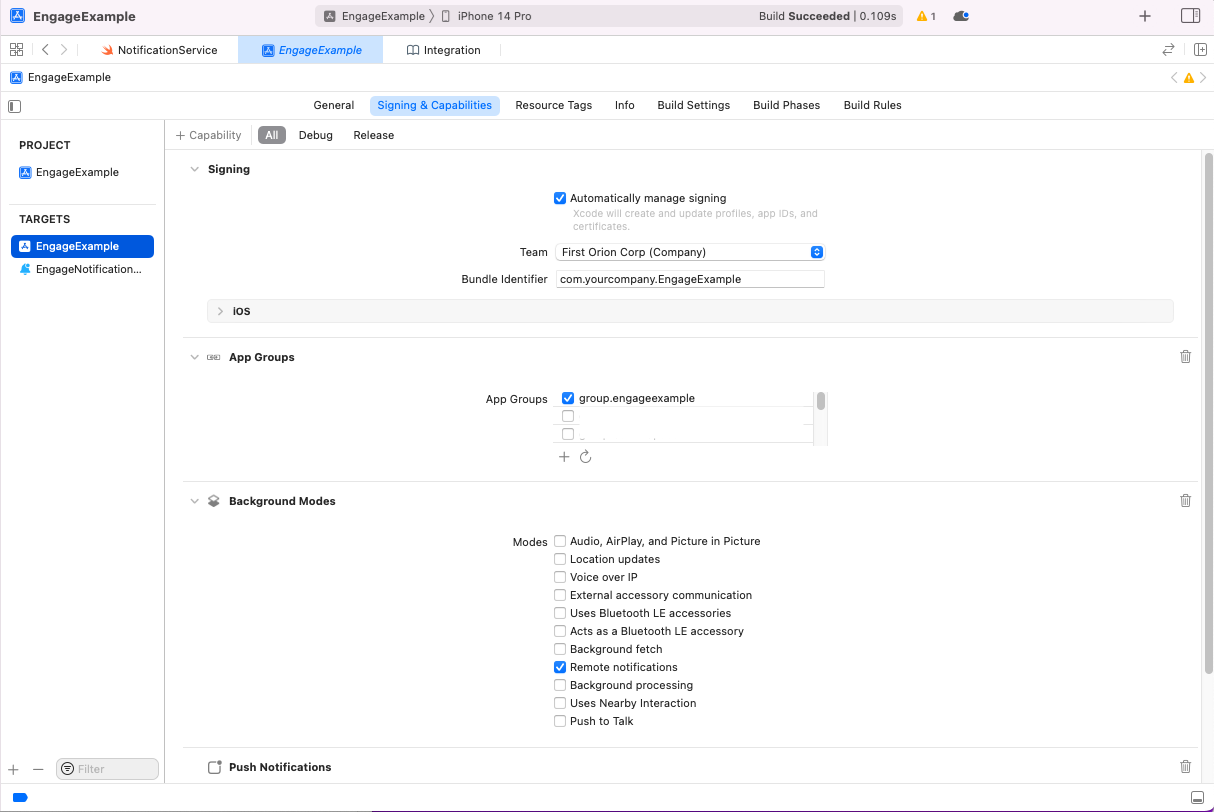
6.1 Select your main app target's "Signing & Capabilities".
6.2 Click "+ Capability" and add "App Groups".
6.3 Add a new app group and give it an appropriate name. If it shows up in red, hit the refresh button below the name to confirm the app group has been registered with your Apple developer account.
6.4 Select the EngageNotificationServiceExtension target's "Signing & Capabilities".
6.5 Click "+ Capability" and add "App Groups".
6.6 Select the same App Group ID as the main app target.
Step 7. Add the ENGAGE Initialization Code
7.1 Request Permissions
Be sure the user is prompted with the native request for notification permissions. Include code similar to the following at the appropriate location in your app:
UNUserNotificationCenter.current().requestAuthorization(options: [.alert, .sound, .badge]) { granted, error in
    // Handle result here
}
7.2 Initialize ENGAGE & Notification Registration
In your AppDelegate file, import the ENGAGE module, then add the following code to the didFinishLaunchingWithOptions method:
import EngageKit

@main
class AppDelegate: UIResponder, UIApplicationDelegate {
    func application(_ application: UIApplication, didFinishLaunchingWithOptions launchOptions: [UIApplication.LaunchOptionsKey: Any]?) -> Bool {
        // Engage Initialization. Change ".debug" to whichever environment is desired.
        Engage.shared.configureSDK(for: .debug, with: "<YOUR_APP_GROUP>")

        // Register the app to receive remote notifications
        UIApplication.shared.registerForRemoteNotifications()

        return true
    }
}
The environment value (.debug, .test, .production) specifies which object to use from the engage-config.json file. More info here.
7.3 Pass APNS tokens to ENGAGE
Still in the AppDelegate file, add the following code to the didRegisterForRemoteNotificationsWithDeviceToken method:
func application(_ application: UIApplication, didRegisterForRemoteNotificationsWithDeviceToken deviceToken: Data) {
    Engage.shared.provideAPNsPushTokenToSDK(deviceToken)
}
7.4 Pass Notifications to ENGAGE
One last step in the AppDelegate file, add the following code to the didReceiveRemoteNotification method.
This will enable notifications that are received while the app is open to be processed. Otherwise, the notification extension will process them.
func application(
        _ application: UIApplication, didReceiveRemoteNotification userInfo:
        [AnyHashable : Any],
        fetchCompletionHandler completionHandler: @escaping (UIBackgroundFetchResult) -> Void
    ) {
    if Engage.shared.isEngagePayload(userInfo) {
         Engage.shared.handleEngagePayload(userInfo) {
             completionHandler(.newData)
         }
     }
 }
Step 8. User Authentication (Challenge)
The ENGAGE SDK must be authenticated against the ENGAGE platform in order to properly communicate with the platform. This process is referred to as the verification “challenge”. Challenge is a crucial step in the onboarding process. It guarantees the ENGAGE platform is communicating with the correct user device.
There are three supported challenge flows to choose from:
- SMS challenge
- Push challenge
- PIN challenge
A description of how to implement each one follows.
SMS Challenge
SMS challenge relies on the host app to perform verification by sending a 6-digit integer code to the device via SMS.
First, a user must provide their phone number, then the SDK is able to trigger an SMS Code. Next, they will need to input the code sent via SMS into your app, which will then be passed to the ENGAGE SDK to complete the challenge.
To properly initiate and complete the SMS challenge, follow the steps as listed below.
8.A1 Pass the user's device phone number to the SDK, triggering an SMS code from the ENGAGE platform.
The number must be passed in E.164 format, i.e. "+18005551234".
func submitPhoneNumber(number: String) {
    Engage.shared.sendChallenge(number) { error in
        if let error = error {
            // Handle error according to the app requirements
            print("Error sending challenge: \(error)")
            return
        }

        // SMS Code was successfully triggered. Navigate to the SMS Code Entry Screen
    }
}
8.A2 Prompt the user to enter their SMS Code, then pass it along to the SDK:
func submitSMSCode(code: String) {
    Engage.shared.completeChallenge(userInput: code) { error in
        if let error = error {
            // A common error is setting incorrect engage-config.json values for apiKey and tokenType
            print("Error sending sms code: \(error)")
            return
        }

        // Challenge flow is now complete
    }
}
Push & PIN Challenge
Push challenge verifies successful app registration with APNS. After initiation, the host app receives a Push Notification that the ENGAGE SDK uses to confirm that there is a verified communication link between the ENGAGE platform and the host app.
PIN challenge is similar to Push Challenge but does not require communication between the host app and APNS.
The code implementation is the same for both Push and PIN challenge. Declare your selection of Push or PIN challenge in the engage-config.json file.
8.B1 Pass the user's device phone number to the SDK
The number must be passed in E.164 format, i.e. "+18005551234".
func submitPhoneNumber(number: String) {
    Engage.shared.sendChallenge(number) { error in
        if let error = error {
            // Handle error according to the app requirements
            print("Error sending challenge: \(error)")

            return
        }

        // Challenge was successfully initiated.
    }
}
8.B2 Add an observer for the "challenge completion" notification from the ENGAGE SDK
Once the ENGAGE SDK has completed the challenge, it will fire the notification .EngagePushVerificationChallengeSucceeded
func observeChallengeCompletion() {
    // Once the Engage SDK has completed challenge, it will fire the notification .EngagePushVerificationChallengeSucceeded
    NotificationCenter.default.addObserver(
        self,
        selector: #selector(onPushChallengeCompletion),
        name: .EngagePushVerificationChallengeSucceeded,
        object: nil
    )
}

@objc func onPushChallengeCompletion() {
    // Handle Engage challenge completion
}
Step 9. Contact Permissions
After the challenge has been completed, request permissions to access the user contacts.
To establish trust with the user regarding privacy concerns, it is best practice to provide a thoughtful explanation of why contact permissions are needed.
Once permissions are granted, be sure to notify the ENGAGE SDK via the contactPermissionsUpdated method.
CNContactStore().requestAccess(for: .contacts) { (granted, error) in
    if let error = error {
        // Handle errors
        print("Error requesting contacts permissions: \(error) )")
    }

    // Notify Engage SDK
    if granted {
        Engage.shared.contactPermissionsUpdated()
    }
}
This concludes the iOS ENGAGE SDK quick start guide. For testing ENGAGE functionality, see this page.
Cross-Platform Compatibility
ENGAGE® support Flutter Framework. Please refer Flutter Quick Start Guide.
Updated 9 months ago