Building with iOS SDK
Building with the ENGAGE® iOS SDK
The ENGAGE iOS SDK is a low-effort integration that will enable iOS applications to receive ENGAGE content and deliver an enhanced calling experience for consumers. This guide provides the detailed integration steps for integrating the ENGAGE iOS SDK into an iOS application.
SDK Version History
| Version | Date | Changes |
|---|---|---|
| 3.0.2 | 28-March-2022 | Minor bug fixes and performance enhancements |
| 3.0.1 | 1-December-2021 | Initial iOS 3.0.1 SDK Release |
Pre-Integration Steps
For a streamlined integration of the ENGAGE SDK into a host app, First Orion may request an Enterprise to provide configuration that will enable communication from the ENGAGE platform to the app. First Orion will provide the necessary tools needed to decrease the integration efforts and increase the time-to-market for an ENGAGE-enabled app.
The ENGAGE platform requires the host app to be configured to receive Push Notifications. In order for the ENGAGE platform to push content to devices, the app builders must provide details relating to the app .p8 file.
First Orion will provide the following during pre-integration:
iOS Gold Copy - a reference application, including source code for understanding the integration points for a host app
geoderiver tool - Python program to extract geometric coordinates of .p8 file to avoid an Enterprise needing to transmit APNS certificates
engage-config.json – a host app configuration file to understand how to communicate with the ENGAGE platform. This configuration file will contain the app ID configured by the First Orion team
First Orion Artifactory Credentials – required for accessing the CocoaPod repository in the First Orion Artifactory
Integration Customer will provide First Orion:
Geometric coordinates – values generated from running the geoderiver tool (X, Y, D)
KeyId – associated with generated APNS .p8 file found in the Keys section in Apple Developer Portal
TeamId – associated with Apple Developer Account and found under the Membership section in the Apple Developer portal
Bundle Identifier – found in Xcode under General section of app configuration
Skill Requirements
- Apple Developer Portal
- Linux
- Swift
- Xcode
- CocoaPods
System Requirements
- MacOS
- Ruby>= 2.0
- CocoaPods >= 1.10
- CocoaPods Plugin to work with Artifactory >= 1.0.5
- Python3
- Xcode >= 12
- Swift 4 or 5
Host App Requirements
- iOS 12.1 or higher
- Ability to link Apple Dynamic Frameworks
- Swift (4 or 5) or Objective-C
- Permissions Required:
- Notifications
- Contact
- Apple Push Notification (APNS)
- Provisioning Profiles
- Host App
- Notification Service Extension
Cross-Platform Compatibility
Cross-platform mobile frameworks are not supported or compatible with ENGAGE SDK
Host App Impact
- SDK Size: ~2mb
- Less if Bitcode-enabled
- Content push data usage: 100kb or less
Level of Effort
| Task | Skillset | Time of Effort |
|---|---|---|
| Install CocoaPods | Linux | 10 min |
| Install Artifactory plugin | Linux | 10 min |
| Configure standard netrc file to authenticate the First Orion artifactory | Linux | 5 min |
| Configure Podfile to resolve ENGAGE dependencies | CocoaPods | 10 min |
| Configure app requirements in Xcode and Apple Developer Portal - including APNS | Xcode / Apple Developer Portal | 45 min |
| Initialize and configure ENGAGE SDK in host app | Swift | 60 min |
| Test ENGAGE SDK integration steps: register device (perform challenge) Push content to device from Portal Make phone call to device - through Portal or different device Check device 15 minutes after successful Push and call to ensure content is not on device | Xcode | 45 min |
Permissions
The ENGAGE SDK requires certain iOS app permissions to be managed and coordinated by the host app. The SDK will not perform as expected if these permissions are not granted.
The following permissions are required to be set in the host app info.plist:
- Contacts
- Notifications
ENGAGE functionality is driven by the permissions a host app is comfortable asking the consumers. The set of ENGAGE components included in the host app’s build file also relates to the functionality and permissions required.
Configure engage-config.json
Flexibility is added to the integration when the SDK interacts with a host app. The engageconfig.json file provides configuration points for network requests to the ENGAGE platform and is required by the host app. This file is responsible for determining the ENGAGE platform configuration associated with the iOS host app. During pre-integration, First Orion will provide the engage-config.json file:
The engageApiKey must match the iOS Bundle identifier configured in Xcode under Signing & Capabilities
Fields to highlight in the JSON file:
{
"debug":{
 "engageApiKey":"com.firstorion.enterprise.engagecalling",
 "engagePushConfig":"foios-enterprise-dev",
 "engageEndpoint":"new-test-api.fo-engage.com"
},
"test":{
 "engageApiKey":"com.firstorion.enterprise.engagecalling",
 "engagePushConfig":"foios-enterprise",
 "engageEndpoint":"new-test-api.fo-engage.com"
},
"production":{
 "engageApiKey":" com.firstorion.enterprise.engagecalling ",
 "engagePushConfig":"foios-enterprise",
 "engageEndpoint":"api.calleryd.com"
},
"appIsVoipEnabled":false,
"engageChallengeType":"sms",
"configVersion":"0.1"
}
| Field | Type | Description |
|---|---|---|
| engageApiKey | String | Must match iOS application's Bundle Identifier - Configured in Xcode |
| engageEndpoint | String | ENGAGE platform endpoint - this will typically never change |
| engageChallengeType | String | The challenge type will determine the initial ENGAGE registration process |
APNS Configuration
Configuring APNS in the Apple Developer Portal allows for two (2) .p8 files to be generated. This provides application developers the ability to use separate .p8 files to communicate with Production and Sandbox APNS. Most times, developers will use the same .p8 file for both Production and Sandbox APNS.
In the engage-config.json, the engagePushConfig field determines which APNS environment to route traffic. In the debug and test configurations, the -dev in the value tells the platform to route traffic through APNS Sandbox environment. All other values, not including -dev, route through the APNS Production environment.
| Environment | APNS Type | ENGAGE Environment | Example Configuration Value provided by First Orion |
|---|---|---|---|
| APNS Production | Production | production | foios-enterprise |
| APNS Sandbox | Sandbox (testing) | test | foios-enterprise-dev |
| APNS Sandbox | Sandbox (testing) | debug | foios-enterprise-dev |
The host app determines which APNS environment to use based on the value set in the AppDelegagte.swift file. The ENGAGE Environment (as listed above) will correspond to the APNS Environment when set accordingly.
NOTE
test and debug options are handled identically by the SDK provided that the engageEndpoint configuration table is the same
let environment: EngageEnvironment = .production | .test | .debug
engage.configureSDK(for: environment, with:
"group.com.firstorion.enterprise.engagecalling")
Xcode Application & Apple Developer Configuration
This section highlights the configuration required in Xcode and Apple Developer portal. Access should be ensured in order to make changes and view configuration from the Apple Developer portal: hrrps://developer.apple.com/
Notification Service Extension
If the app does not already have one, create a Notification Service Extension in order to act on Push notifications that are delivered to devices. This becomes an App Extension target that is bundled with the app.
Create Notification Service Extension
- In Xcode, go to: File -> New -> Target -> Notification Service Extension
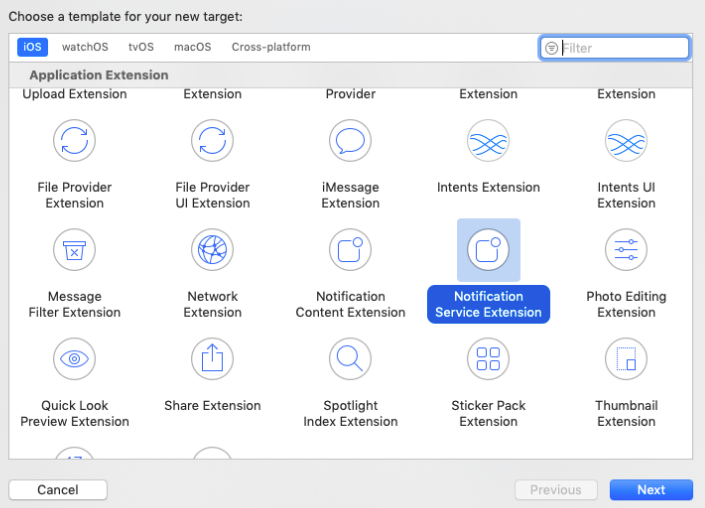
Select the Notification Service Extension
- Enter the name of the Extension. First Orion recommends: NotificationService
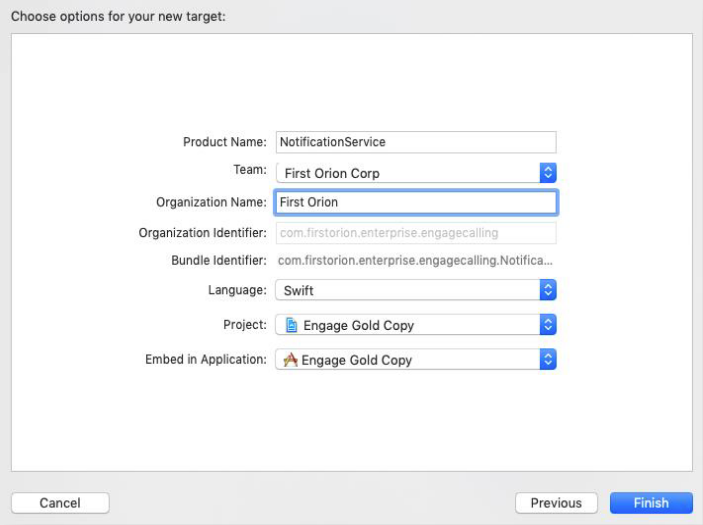
Name the new Extension
- After creating the Notification Service, the main application and the Notification Extension Service target will be visible.
Push Notifications
Enable Push Notifications capabilities from the main app target. Notification permissions for prompting users is explained in the Main Application Integration section of this guide.
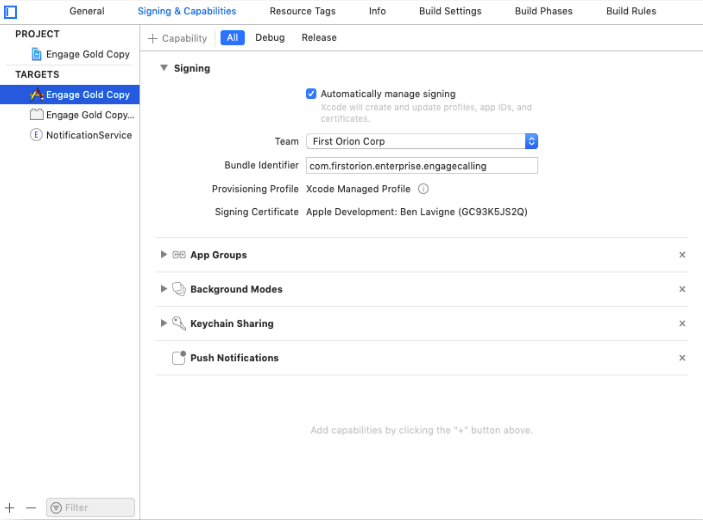
Enabling Push Notification capabilities from Main App Target
App Groups
Enabling App Groups is required for both the main app target and the notification service extension target. The given name of the App Group must be in both targets. The App Group must match the name configured when the ENGAGE SDK is configured in the AppDelegate and the Notification Service Extension class:
Engage.shared.configureSDK(for: .production, with: "group.com.firstorion.enterprise.engagecalling")
Engage.shared.handleNSEPush(request, using: "group.com.firstorion.enterprise.engagecalling", withContentHandler: contentHandler)
Requirement
App Groups are required to be added from the Capabilities tab and NOT directly in the .entitlements file
Main Application Target
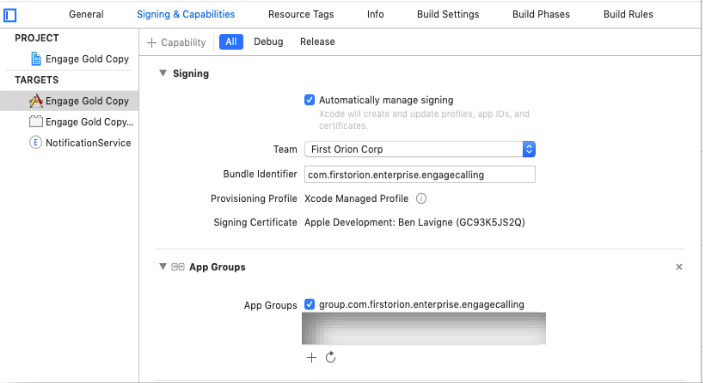
Engage Gold Copy
Notification Service Extension Target
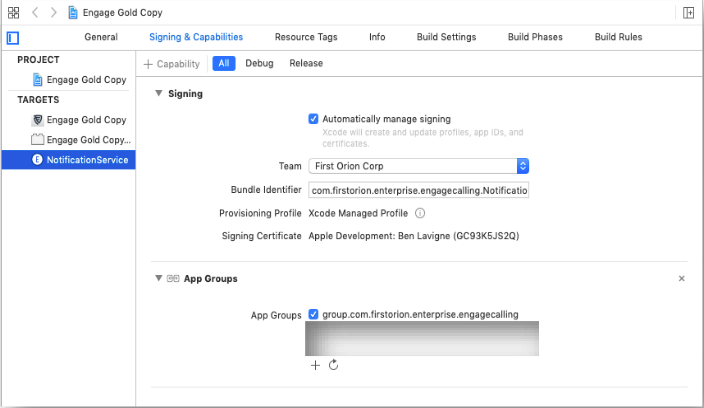
NotificationService
Resolve ENGAGE SDK Dependencies
The suggested and preferred way to resolve the ENGAGE SDK dependencies is to access the binaries from the First Orion Artifactory, which is a CocoaPod package. This particular method requires setting the correct system configurations to authenticate against Artifactory.
CocoaPod >= 1.10 Requirement
The required CocoaPods version must be 1.10 or above to support the ENGAGE SDK which is compiled as an XCFramework.
Required Prerequisites
- Ruby >= 2.0 installed
- CocoaPods >= 1.10 Installed
- CocoaPods Artifactory Plugin >= 1.4 installed
Configure First Orion Artifactory
Install CocoaPods Artifactory Plugin:
$ gem install cocoapods-art
Add First Orion Repository:
To resolve ENGAGE pods, add First Orion repo to client
$ pod repo-art add fo-cocoapods-external
"https://firstorion.jfrog.io/firstorion/api/pods/fo-cocoapods-external"
Authentication:
To authenticate, please add the credentials to the client .netrc file
machine firstorion.jfrog.io
login <USERNAME>
password <PASSWORD>
Configure Podfile
Resolve Pods:
Add First Orion repo to Podfile:
plugin 'cocoapods-art', :sources => [
'fo-cocoapods-external'
]
Configure ENGAGE Pods:
- Add ENGAGE pod to Main Application target
- Add ENGAGE pod to Notification Extension target
source 'https://github.com/CocoaPods/Specs.git'
plugin 'cocoapods-art', :sources => [
'fo-cocoapods-external'
]
# Comment the next line if you don't want to use dynamic frameworks
use_frameworks!
target 'Engage Gold Copy' do
pod "Engage", "=3.0.2"
# Pods for XC11TestBed
target 'Engage Gold CopyTests' do
 inherit! :search_paths
 # Pods for testing
end
end
target 'NotificationService' do
pod "Engage", "=3.0.2"
end
Install Pods:
$ pod install
Main Application Integration
This section covers the configuration and changes required in the host app code. The majority of the changes will be done in the AppDelegate class
AppDelegate Changes
Import ENGAGE Module:
Add the ENGAGE module along with other imported modules:
import ENGAGE
Initialize ENGAGE:
To properly initialize the ENGAGE SDK add the following to the app: application(_:didFinishLaunchingWithOptions:)
Engage.shared.configureSDK(for: .production, with: "group.<YOUR_APP_GROUP>")
Require Push Notification:
Users must be prompted to allow Push Notifications to an app. An example of requesting Push Notifications from users:
UNUserNotificationCenter.current()
.requestAuthorization(options: [.alert, .sound, .badge]) { [weak self] granted, error
in
 log("Permission granted: \(granted)", .info)
 guard granted else { return }
 self?.getNotificationSettings()
}
Register for Push Notifications with APNS:
Implement the following code to register the device with APNS:
private func getNotificationSettings() {
  UNUserNotificationCenter.current().getNotificationSettings { settings in
    print ("Notification settings: \(settings)")
    guard settings.authorizationStatus == .authorized else { return }
    DispatchQueue.main.async {
      UIApplication.shared.registerForRemoteNotifications()
    }
  }
}
Receive APNS Device Token:
The APNS device token is used for the ENGAGE platform to communicate with enabled devices. To receive the device token, when APNS registration is complete, implement the following code:
func application(_ application: UIApplication,
didRegisterForRemoteNotificationsWithDeviceToken deviceToken: Data) {
 Engage.shared.provideAPNsPushTokenToSDK(deviceToken)
}
Receive Push Notification when App Open
To allow Push Notifications even when the app is currently open, implement the following code:
func application(_ application: UIApplication, didReceiveRemoteNotification userInfo:
[AnyHashable : Any], fetchCompletionHandler completionHandler: @escaping
(UIBackgroundFetchResult) -> Void) {
 if engage.isEngagePayload(userInfo){
 engage.handleEngagePayload(userInfo){}
 }
Authentication (challenge)
The ENGAGE SDK must be authenticated against the ENGAGE platform in order to properly communicate with the platform. This process is referred to as the verification “challenge”. Challenge is a crucial step in the onboarding process. It guarantees the ENGAGE platform is communicating with the correct user device.
There are three challenge flows that the ENGAGE SDK and platform support:
- SMS
- Push challenge
- PIN challenge
SMS Challenge
SMS challenge relies on the host app to perform verification by sending a unique code to the device, using SMS, after a user has provided a phone number. Users will input the code sent via SMS, which is passed to the ENGAGE SDK, to complete the challenge. To properly initiate and complete the SMS challenge, follow the steps as listed.
Host App SMS Verification
If the host app currently performs SMS verification, skip to step 3 to complete only the challenge process
- Send challenge request to ENGAGE platform. Pass the device phone number to trigger SMS and navigate to code verification screen:
@IBAction func sendButtonPressed(_ sender: Any) {
   guard let phoneNumber = phoneNumberTF.text else { return }

   // Call sendChallenge and pass in the phone number
   Engage.shared.sendChallenge(phoneNumber) { errror in
     guard error != nil else {
       print("Error sending challenge: \(error)")
       return
     }

     // Don't segue to code entry screen if push challenge, as code entry is not
needed
     guard isPushChallenge == false else { return }

     // Continue to next code entry screen if challenge was sent successfully
     self.performSegue(withIdentifier: "phoneNumberEntryToCodeEntry", sender: nil)
   }
 }
- Enter verification code sent in SMS and pass to ENGAGE SDK to complete ENGAGE challenge:
@IBAction func submitButtonPressed(_ sender: Any) {
  guard let code = codeTextView.text else { return }
  // Use the received code to complete the challenge.
 completeEngageChallenge(with: code)
}
- If verification code is validated, complete the challenge process:
/// Request Engage SDK to complete challenge with provided challenge code
/// - Parameter code: challenge code received
private func completeEngageChallenge(with code: String) {

  Engage.shared.completeChallenge(userInput: code) { error in
    // No expected errors here if apiKey and tokenType in EngageConfigurationObject are
valid, and code sent in was code received in SMS
    guard error == nil else {
    // handle possible errors: Invalid code
    return
  }

  // Alert delegate that challenge is complete to close Engage flow, implementation
detail of simple flow, subject to desired UI
  self.engageChallengeDelegate?.challengeCompleted()
 }
}
- After the challenge is successful, request the Contact permission from the user. There is more detail in the User Onboarding section.
Push Challenge and PIN Challenge
Push challenge relies on successfully registering the host app with APNS. The host app then receives a Push Notification that signals to the ENGAGE SDK there is a verified communication link between the ENGAGE platform and the host app.
PIN challenge is similar to Push but does not require communication between the host app and APNS. If using PIN challenge, the same methods for Push challenge (code snippets below) are used. Declare either Push or PIN challenge in the engage-config.json file.
To properly initiate and complete Push challenge, follow these steps:
- The host app will listen for the notification to signal that challenge has been completed:
override func viewDidLoad() {
 super.viewDidLoad()
 // Do any additional setup after loading the view.
 // Listen for Notification that signals challenge/auth is complete for Push
verification
 NotificationCenter.default.addObserver(self, selector:
#selector(onPushChallengeCompletion(_:)), name:
.EngagePushVerificationChallengeSucceeded, object: nil)
}
- Users will input the device phone number to be passed into ENGAGE SDK and sent to the platform, beginning the challenge process:
@IBAction func verifyPhoneNumber(_ sender: Any){
  guard let phoneNumber = phoneNumberTextField.text else { return }
  Engage.shared.sendChallenge(phoneNumber) { error in
    //A challenge can only be requested from the backend every 5 seconds, or the
service will return an error.
    //Only other expected errors here are if apiKey and tokenType in
EngageConfigurationObject are valid
    guard error == nil else {
      if case .ChallengeRequestRateLimited = error! {
        print("Too many requests, please try again in a few seconds.")
      }
      return
    }
  }
}
- When the challenge is complete, the host app should request Contact permission. Whenever the Contact permission is updated, it is important to notify the ENGAGE SDK by calling Engage.shared.contactPermissionsUpdated():
Import Contacts
"Import Contacts" must be at the top of the file
func challengeCompleted() {
  // Persist that challenge was completed in desired method
  UserDefaults.standard.set(true, forKey: engageChallengeCompletedKey)
  navigation.dismiss(animated: true, completion: nil)
  CNContactStore().requestAccess(for: .contacts) { (granted, error) in
    if let error = error { NSLog("[ENGAGE] \(error) )") }
    if granted{
      DispatchQueue.main.async {
        Engage.shared.contactPermissionsUpdated()
      }
    }
  }
}
User Onboarding
Requesting permissions from end-users is a required step that allows the ENGAGE SDK to perform its core functionality. The Contact permission is the most important permission a host app must require. First Orion follows best practices for educating users regarding the Contact permission request, especially when such a request may seem outside a typical Enterprise function.
If more information regarding acceptable methods of requesting the Contact and other permissions is needed, First Orion will provide supplemental documentation.
Gold Copy Example
The ENGAGE iOS Gold Copy has a complete code examples for requesting permissions and related functionality outlined below. Please refer to the HomeVC.swift class for a working example of User Onboarding.
Requesting Contact Permission: Current User
Host apps that have already requested the Contact permission must inform the ENGAGE SDK by calling the following method:
Engage.shared.contactPermissionsUpdated()
By calling the contactPermissionsUpdated method above, the ENGAGE platform will be notified that the host app has been granted Contact permission.
Requesting Contact Permission: New User Example
The appropriate location to request the Contact permission for the first time is after the ENGAGE Challenge has been completed. Some host apps may prefer to ask users for Contact permission later during the onboarding since it may be useful for host apps that need a thorough explanation as to why users should grant access to Contacts.
The following code example shows how to confirm the ENGAGE Challenge has been completed and whether the device is considered to be registered with the ENGAGE Platform. This will ensure the communication from the Platform to the device is verified.
The recommended implementation of requesting the Contact permission, when the host app has never previously requested Contact permission, is illustrated below:
/** Starts Engage Challenge flow.
 UI flow and user interaction are just implementation details up to the host app, the
Engage SDK just needs:
 1. Engage.sendChallenge() to be called with the phone number
 2. Engage.completeChallenge() to be called with the received code
 Note: if using the SMS challenge, resending of the code via a mechanism to recall
Engage.sendChallenge() with the phone number might be desired
 */
private func showEngageChallengeIfNeeded() {
 // Challenge will only need to be completed once as JWT received does not expire.
Perist that challenge was completed in desired method

  if engageEnabled == false {
    let storyboard = UIStoryboard(name: "Main", bundle: nil)
    navigation = storyboard.instantiateViewController(withIdentifier: "WalkthroughID")
as? UINavigationController
    let phoneNumberEntryVC = navigation.topViewController as? PhoneNumberEntryVC
    phoneNumberEntryVC?.engageChallengeDelegate = self
    self.present(navigation, animated: false, completion: nil)
 } else {
   requestPermissionsIfNeeded()
 }
}
private func requestPermissionsIfNeeded() {
  requestContactsAuthorization { granted in }
}
private func requestContactsAuthorization(_ completion: @escaping (Bool) -> ()) {

  let permissionStatus = CNContactStore.authorizationStatus(for: .contacts)

  switch permissionStatus {
  case .authorized:
    Engage.shared.contactPermissionsUpdated()
    completion(true)
   // if permission has already been requested and denied or restricted, show alert to
request user to change this permission
  case .denied, .restricted:
    if !isPermissionAsked{
      self.showPermissionDisabledAlert(permission: "Contacts")
    }
    return
  // If is undetermined, system prompts the user to allow access, the purpose string
from info.plist is displayed as part of the alert
 case .notDetermined:
   CNContactStore().requestAccess(for: .contacts) { (granted, error) in
     if let error = error { NSLog("[ENGAGE] \(error) )") }
     completion(granted)
   }
 }
}
Notification Service Extension
When adding a new Notification Service Extension to the project, Xcode adds generated code to the newly created class. These steps will configure the extension to process incoming ENGAGErelated notifications.
Build Settings
In the Notification Extension build settings, the value for “Require Only App-Extension-Safe API” must be set to “YES”
Import ENGAGE Module
At the top of the extension class, import the ENGAGE module:
import Engage
Notifications Extension Service Class
This function should be added to the Notification Service Extension class in order to process incoming Push Notifications.
New in v3.x
An optional parameter in Engage.handleNSEPush may be used to hide the thumbnail image in notifications. If this parameter is left out, images will show as the default. If upgrading from < v3.0.2, no API changes are necessary:
class NotificationService: UNNotificationServiceExtension {
  var contentHandler: ((UNNotificationContent) -> Void)?
  var content: UNMutableNotificationContent?

 override func didReceive(
   _ request: UNNotificationRequest,
   withContentHandler contentHandler: @escaping (UNNotificationContent) -> Void
 ) {
   Engage.shared.handleNSEPush(
     request,
     using: "group.your-app-group-name", // Insert your App Group ID
     includeThumbnail: false, // (Optional) Defaults to true if left out
     withContentHandler: contentHandler // Pass in the content handler parameter
   )
 }

 /// Called just before the extension will be terminated by the system.
 override func serviceExtensionTimeWillExpire() {
    // Optional - This line is not required, but will help us in debugging
    Engage.shared.nseTimeExpiring()

    // Suggested by Apple
    if let contentHandler = contentHandler, let content = content {
      contentHandler(content)
    }
  }
}
Push Notifications
Push notifications are required in the host app configuration, including the appropriate configuration in the Apple Developer Portal, to obtain the apps .p8 file.
Generate .p8 File
The .p8 file is generated from the Apple Developer portal. It is important to select the correct option when generating the file.
From the Apple Developer portal, select:
Keys -> All -> + (plus button in the top-right)
Then, enter the Name of the new key and select:
Apple Push Notification Authentication Key (Sandbox & Production)
ENGAGE Configuration Requirements
The platform must have the following cryptographic configuration set to enable the ENGAGE platform to complete a PUSH or PIN challenge and to send Push Notifications to the host app.
There are five (5) values that are required to enable this functionality. These values should be delivered to First Orion prior to testing ENGAGE functionality from the host app. The required values are:
- X
- Y
- D
- TeamId
- KeyId
The X, Y, D values are generated by using the host app's .p8 file. To generate the X, Y, D values, First Orion will provide a CLI tool which will take the location of the .p8 file as a parameter and print the values in the terminal. See: CLI Tool – Generate X, Y, D Values. TeamID and KeyID are found in the Apple Developer portal.
CLI Tool: Generate X, Y, D Values
Prior to integration, First Orion will share the CLI tool which will be delivered as an archive (.tar.gz). The tool is a Python-based utility and will execute in a terminal window once it is successfully unpackaged and installed. The following steps will assist in using the CLI tool:
-
Unpackage the tool: geoderiver-0.0.1.tar.gz
-
Change directory to the location where tool was unpackaged:
$ cd geoderiver-0.0.1
- Run command, this will install the geoderiver tool:
$ python3 setup.py install
- In the unpackaged directory, locate the appropriate .p8 file to execute the geoderiver tool:
$ python3 geoderiver --file ~/Enterprise.p8
- The output should resemble the following:
read EC key
writing EC key
d: DDDDDDDDDDDDDDDDDDDDDDDDDDDDDDDDDDDDDDDDDDDDDDDDDDDDDDD
x: XXXXXXXXXXXXXXXXXXXXXXXXXXXXXXXXXXXXXXXXXXXXXXXXXXXXXXXXXXX
y: YYYYYYYYYYYYYYYYYYYYYYYYYYYYYYYYYYYYYYYYYYYYYYYYYYYYYYYYYYYYY
Known Issue Using geoderiver Tool
There is a known issue with an instance of openssl when using the geoderiver tool to generate the geometric coordinates from a .p8 file. To get around the issue, an older version of openssl is required and can be installed.
If using Homebrew to install system dependencies, there is an alternative way to install the correct version of openssl. Homebrew 2.5 has removed the ability to install dependencies directly from git repos using a URL.
The common error when executing the tool will appear:
mbp:geoderiver-0.0.1 user$ python3 geoderiver --file ../Auth_Key.p8
../Auth_Key.p8
read EC key
writing EC key
dyld: Library not loaded: /usr/local/opt/openssl/lib/libcrypto.1.0.0.dylib
 Referenced from: /Users/benlavigne/Downloads/geoderiver-0.0.1/./bin/public_key_derive
 Reason: image not found
The following steps will resolve the issue using Homebrew prior to version 2.5
- Uninstall current openssl version:
mbp:geoderiver-0.0.1 user$ brew uninstall --ignore-dependencies openssl
- Install previous openssl version 1.0.0:
mbp:geoderiver-0.0.1 user$ brew install
https://github.com/tebelorg/Tump/releases/download/v1.0.0/openssl.rb
- Run the geoderiver tool:
$ python3 geoderiver --file ~/Enterprise.p8
read EC key
writing EC key
d: DDDDDDDDDDDDDDDDDDDDDDDDDDDDDDDDDDDDDDDDDDDDDDDDDDDDDDD
x: XXXXXXXXXXXXXXXXXXXXXXXXXXXXXXXXXXXXXXXXXXXXXXXXXXXXXXXXXXX
y: YYYYYYYYYYYYYYYYYYYYYYYYYYYYYYYYYYYYYYYYYYYYYYYYYYYYYYYYYYYYY
- Re-set openssl version if needed:
mbp:geoderiver-0.0.1 user$ brew install openssl
The following steps will resolve the issue using Homebrew after version 2.5
- Navigate to local installation of Homebrew:
mbp:~ user$ cd /usr/local/Homebrew/
- Because Homebrew 2.5 removed the ability to install directly from a git repo we must checkout an older version of Homebrew:
mbp:Homebrew user$ git checkout 2.3.0/
- Install openssl latest 1.0.x version:
mbp:Homebrew user$ HOMEBREW_NO_AUTO_UPDATE=1 brew install
https://github.com/tebelorg/Tump/releases/download/v1.0.0/openssl.rb
- Go back to current version of Homebrew:
mbp:Homebrew user$ git checkout -
- Tell Homebrew to use the old version of openssl this way you can switch between installed versions:
mbp:Homebrew user$ brew switch openssl 1.0.2t
- Run the geoderiver tool:
$ python3 geoderiver --file ~/Enterprise.p8
read EC key
writing EC key
d: DDDDDDDDDDDDDDDDDDDDDDDDDDDDDDDDDDDDDDDDDDDDDDDDDDDDDDD
x: XXXXXXXXXXXXXXXXXXXXXXXXXXXXXXXXXXXXXXXXXXXXXXXXXXXXXXXXXXX
y: YYYYYYYYYYYYYYYYYYYYYYYYYYYYYYYYYYYYYYYYYYYYYYYYYYYYYYYYYYYYY
- Re-set openssl version if needed:
mbp:geoderiver-0.0.1 user$ brew install openssl
Test ENGAGE SDK Integration
Note on Functional Testing
Simulators should not be used to verify ENGAGE SDK functionality when integrated into the host app. To verify ENGAGE functionality, real network traffic must be available in order to validate that incoming calls are displaying the expected content
Functionality needs to be tested after completing the ENGAGE SDK integration. From the Customer Portal, customers can deliver content to a device through an easy-to-use interface. A valid, configured ENGAGE Program must be created in the Customer Portal before delivering the content. First Orion will provide testing assistance at any time.
Delivering ENGAGE Content to Device
First Orion provides a set of APIs to deliver ENGAGE content to an enabled device. The Customer Portal also provides an easy-to-use mechanism to deliver content in real-time for testing purposes. From the Customer Portal you can also schedule Batch Push by uploading a formatted .csv file.
APIs and Programmatic Delivery Options
- Real-Time Push
- Batch Push
- Mobile Push Library
- Android
- iOS (Swift)
Cross-Platform Frameworks
Cross-platform frameworks are not supported with the ENGAGE SDK. There are various restrictions to native capabilities that are included in the frameworks. These restrictions will prevent the full functionality of the ENGAGE SDK when attempting to integrate a host app as constructed in cross-platform frameworks.
Cross-platform frameworks are defined as:
Development frameworks that allow developers to create mobile applications, with a single codebase, that are compatible with one or more mobile operating systems, both Android and iOS.
The following, but not limited to, are cross-platform frameworks that are not supported:
- React Native
- Ionic
- Flutter
Troubleshooting
CocoaPods
When working with CocoaPods, it is sometimes necessary to remove the local Pod repo and resync, This is occasionally needed when new SDK releases become available and the client’s local CocoaPods repo needs to re-sync.
The following steps outline the removal of the First Orion Pod repository from the client and resyncing.
Remove Pods from Artifactory Repo:
$ pod repo-art remove fo-cocoapods-external
Remove Local CocoaPods References:
$ rm -rf ~/.cocoapods/repos/fo-cocoapods-external
Remove Cocoapod Cache (not always required):
$ pod cache clean --all
Deintegrate Cocoapod (not always required):
$ pod deintegrate
Re-add First Orion CocoaPods Repo:
$ pod repo-art add fo-cocoapods-external
"https://firstorion.jfrog.io/firstorion/api/pods/fo-cocoapods-external"
Install Pods from Podfile:
From the project’s main directory, pod install could also be used:
$ pod update
Compiler Error
If you experience a compiler error while building the SDK in Xcode:
- Open the Pods project and select the ENGAGE target
- Verify that the Build Setting values for “Architectures” only includes the architectures supported by the enterprise app
- Set the “Build Active Architecture Only” build setting to “YES” for Debug only
- Try to build
Removing Bitcode
Bitcode may be manually removed if it is not used. ENGAGE SDK should be manually added instead of Cocoapods. During this process, bitcode will need to be removed using Xcode runtime:
xcrun bitcode_strip -r Engage.xcframework/ios-arm64/Engage.framework/Engage -o
EngageArm64NoBitcode
Updated about 2 years ago
