RingCentral CC - Call Authentication
Pre-requisites
- Annual Contract Agreement with First Orion Branded Communications (Post paid)
- Access to First Orion Customer Portal
- Vetted and Approved Business
- RingCentral CC Studio access
Expectations
- Customer can facilitate changes to the RingCentral platform for configuration
- Access to RingCentral CC Studio setup integration.
- Thorough testing involving customer and First Orion
- Proper lead time to schedule “go live” between customer and First Orion Pre-Requisites
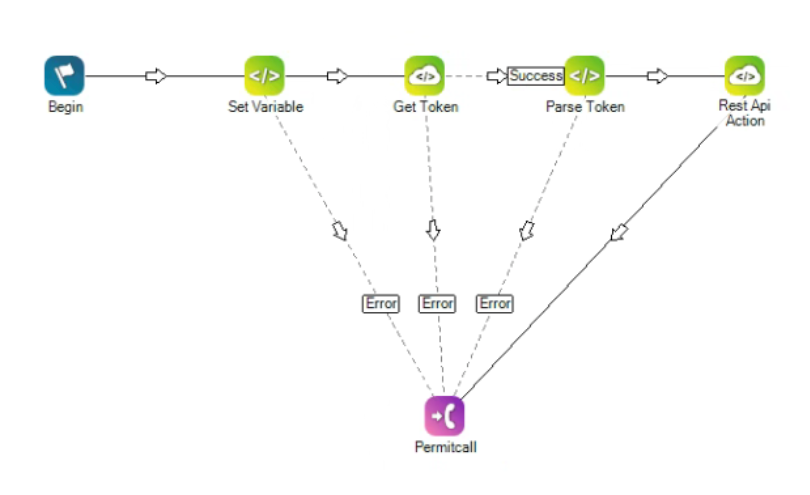
Step 1: Create Phone ScriptCall Auth
- In RingCentral Developer Studio, create a new Phone Script.
- Drag in a "Begin" block.
- Drag in a "Snippet" block. Connect the Begin Block to this block.
- Drag in a "Rest Api Action" block. Connect the Snippet Block to this block.
- Drag in another "Snippet" block. Connect the Rest Api Action Block to this block.
- Drag in another "Rest Api Action" block. Connect the second Snippet Block to this block.
- Drag in a Place Call Block. Connect the second Rest Api Action Block to this block.
- Connect the errors from each block to the Place Call Block. This will let the call continue in the event on a failure.
- Note: Sentry will Block the call if the Call Authentication request does fail.
Step 2: Setup blocks
1. Set Variable Block (first block)
Open the Snippet block and past the code below. Replace "YOUR_BASE64_ENCODED_CLIENT_ID_AND_SECRET" with your First Orion encoded keys. Example: api_key:secret_key
// OAuth2 Configuration
ASSIGN oauthTokenUrl = "https://api.firstorion.com/v2/auth"
ASSIGN authCredentials = "Basic YOUR_BASE64_ENCODED_CLIENT_ID_AND_SECRET"

// Precall API Configuration
ASSIGN mainApiUrl = "https://api.firstorion.com/exchange/v1/calls/push"

// Contact Variables
ASSIGN bNumber = "{_phonenum}"
2. Set Rest Api Action Block (second block)
Open the first Rest Api Action block. Set the variables to the ones below.
| Field | Value |
|---|---|
| ServiceAddress | {oauthTokenUrl} |
| Verb | POST |
| Headers | {"Authorization":"{authCredentials}"} |
| Parameters | {"grant_type":"client_credentials"} |
| TimeoutMilliSeconds | 2000 |
| resultSet(out) | authResponse |
3. Set Variable Block (third block)
// Extract access token from response
ASSIGN accessToken = "Bearer {authResponse.access_token}"

// Build precall request body using DYNAMIC object
DYNAMIC precallData
ASSIGN precallData.aNumber = "{aNumber}"
ASSIGN precallData.bNumber = "{bNumber}"
ASSIGN precallBody = "{precallData.asjson()}"
4. Set Rest Api Action Block (fourth block)
| Field | Value |
|---|---|
| ServiceAddress | {mainApiUrl} |
| Verb | POST |
| Headers | {"Content-Type":"application/json","Authorization":"{accessToken}"} |
| Parameters | {precallBody} |
| TimeoutMilliSeconds | 1000 |
| resultSet(out) | precallResponse |
Step 3: Create Call Authentication Program
- See the Call Authentication Guide for detailed Program creation instructions.
- Add the RingCentral CC phone numbers into the Call Authentication Program.
Step 4: Make Phone Calls
Test phone calls from your RingCentral CC phone numbers that have been added to a Call Auth Program.
Troubleshoot Checklist
- Check Branding approval.
- Check Call Authentication Program
- Verify Phone numbers are in a Call Authentication Program
Updated about 1 month ago
Did this page help you?